

There’s something mesmerizing about spider web cookies—their intricate design and delicious flavor make them a standout treat for any occasion. Reusable experience seeks to produce desserts which maintain an exquisite appearance though their basic preparation process remains straightforward. You can achieve a delightful and effortless web design through smooth icing or melted chocolate in these cookies. Whether you’re baking for a special gathering, adding a decorative touch to your dessert table, or simply indulging in a fun baking project, these spider web cookies are sure to impress. The next step begins now to produce this remarkable dessert creation.
Table of Contents
Key Benefits of Spider Web Cookies
If you’re looking for a treat that’s as fun to make as it is to eat, spider web cookies are the perfect choice. These creative cookies deliver enjoyable ease while providing delicious taste which suits every baking expertise from novices to experts. Here’s why you’ll love them:
Elegant appealing web design elements create an elegant eye-catching element for your dessert table.
Novice decorators need not worry since you only need basic precision and artistic imagination to create these cookies.
Customizable: Choose your favorite cookie base, from classic sugar cookies to rich chocolate ones.
These cookies make ideal treats for parties combined with themed decorations or they work well as dessert platters or serve as enjoyable homemade pastries.
This activity becomes an excellent kitchen practice for children to learn basic cooking skills and stimulate their imagination.
You need ordinary items and creative ideas to develop stunning edible artwork from plain cookies. Our lesson begins with an examination of what we need for this project.
Ingredients for Spider Web Cookies
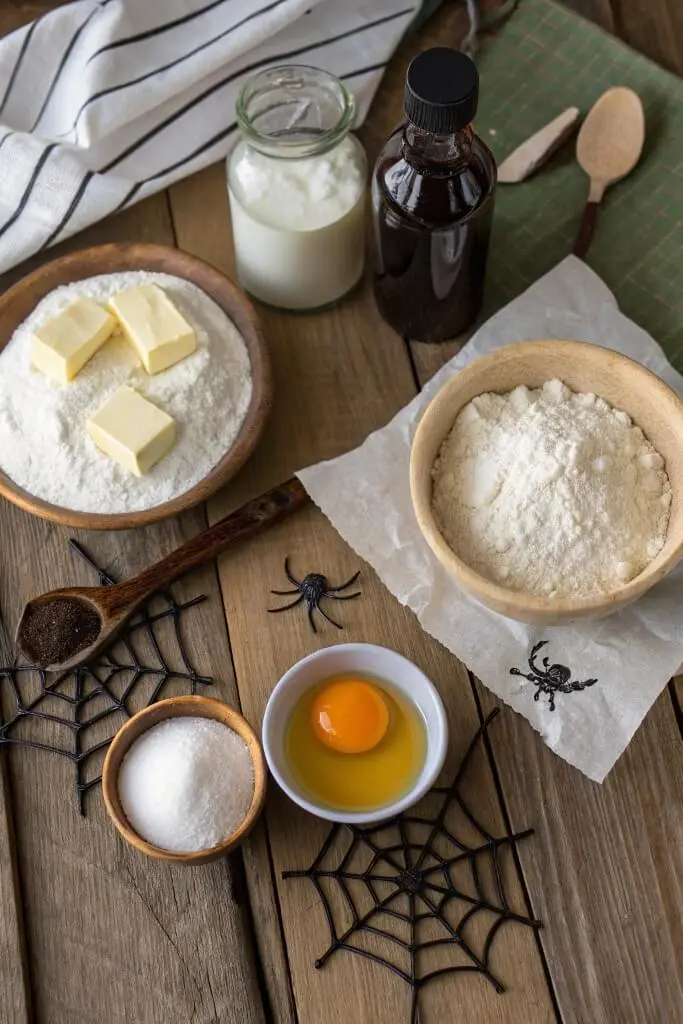
Before you start decorating, you’ll need a few key ingredients to create the perfect spider web cookies. Simple ingredients comprising different flavors of base cookies help you make the best results in your batch.
For the Cookies:
- 2 ½ cups all-purpose flour (for the perfect texture)
- 1 cup soft unsalted butter serves to enrich the cookies.
- You will need ¾ cup granulated sugar as your sweetening ingredient.
- A large egg functions as the dough binder since it provides cohesion.
- 2 teaspoons vanilla extract (enhances flavor)
- ½ teaspoon baking powder (for a slight lift)
- ¼ teaspoon salt (balances sweetness)
For the Spider Web Decoration:
- The smooth icing requires one cup of powdered sugar as a key ingredient.
- Adjust two to three spoonfuls of milk or water for maintaining appropriate consistency.
- Vanilla or almond extract quantity at ½ teaspoon delivers a gentle taste enhancement.
- Black cocoa powder or melted dark chocolate (for the web design)
- A piping bag and toothpick will serve for accurate decoration.
Optional Add-Ons:
- A small amount of food coloring functions as an icing color kit.
- Sprinkles or edible glitter (for extra flair)
The next part involves steps to create these decorative cookies beginning with the materials you have prepared.
How to Make Spider Web Cookies
Creating spider web cookies is a fun and rewarding process. The combination of soft cookies with their beautiful webbing makes them just as exciting to bake as they are to eat. Applenty more success will come from exactly following these systematic rules.
Step 1: Prepare the Dough
Using a large mixing bowl combine butter and sugar until both ingredients become smooth and creamy. The incorporation in this step produces cookies that have a tender melt-in-your-mouth consistency.
After cracking the egg you should add the vanilla extract which will blend completely into the mixture.
Combine the flour with baking powder along with salt inside a separate bowl after stirring to achieve equal ingredient distribution.
Gradually incorporate the dry mix into the wet mixture while stirring only to achieve a properly formed soft dough. Working the dough excessively must be avoided because it makes the cookies become heavy.
When refrigerated under 30-minute plastic wrap cover the dough becomes easy to roll out while reducing spread across the surface.
Step 2: Shape and Bake
Use 350°F (175°C) heat from your oven to prepare your baking sheets after placing either parchment paper or a non-stick mat on top.
Cover a tabletop with flour before rolling the dough to 1/4 inches thickness for uniform baking results.
Transfer the prepared baking sheet onto the surface using a round cutter or a glass wine rim to create the cookies. Leave enough space between each one.
Place the tray in the oven for 8–10 minutes while the edges turn firm with no brown color development.
Place the cookies on a wire rack after they rest for one or two minutes on the tray before their complete cooling process.
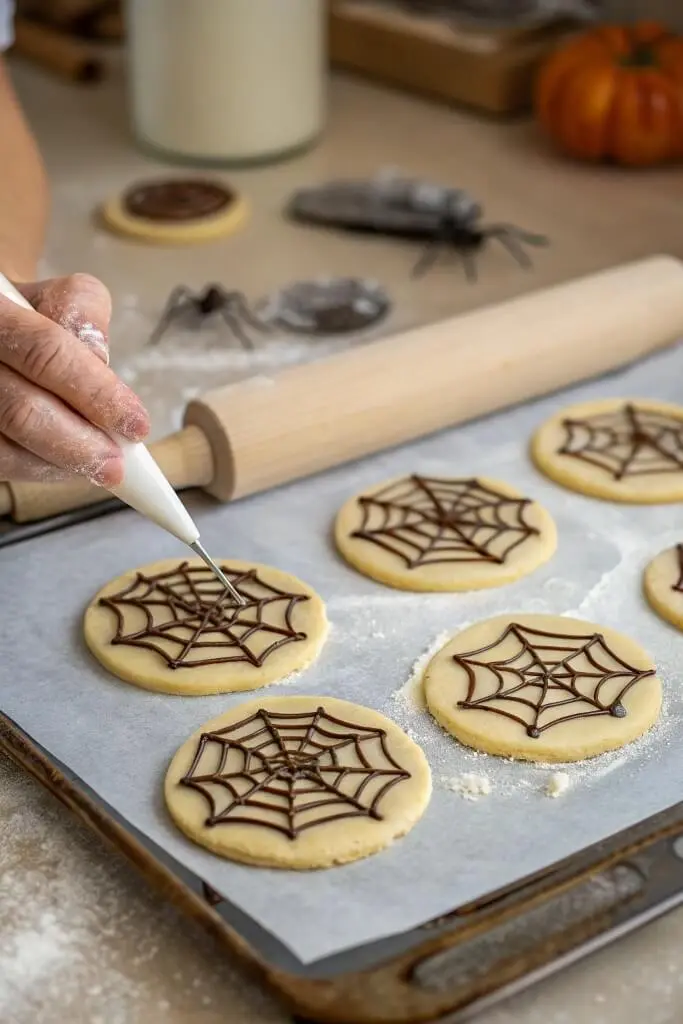
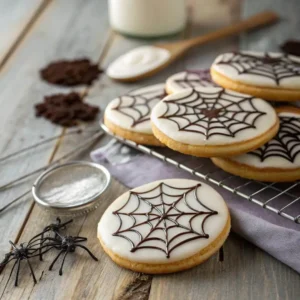
Step 3: Decorate with a Spider Web Design
Mix cleaned and fresh powdered sugar with milk and vanilla extract under whisking motion to develop pourable icing. Add more milk droplets one teaspoon at a time according to the icing’s consistency.
Apply a thin coating of icing to every cookie using either a spoon or an offset spatula as your implement.
Apply melted dark chocolate or black cocoa icing into three to four circles across icing surfaces to achieve a web design.
While the icing remains wet hold a toothpick to drag from the center touching outer edges in equal spaces for creating this delicate web effect.
Allow the cookies to remain untouched until the dry time has finished to achieve a glass-like surface.
And just like that, your spider web cookies are ready to enjoy! The following part will reveal professional advice along with original variations which let users personalize their batch.
Pro Tips and Variations
Creating spider web cookies is not only fun but also offers plenty of opportunities to get creative. An assortment of expert tips alongside alternative variations helps kitchen experts produce high-quality bakery results for anyone who desires customized flavor or decoration with ingredient substitutions.
Pro Tips for Perfect Spider Web Cookies
The freezing time of thirty minutes or longer before dough rolling produces both perfect texture and minimized cookie spread. Placing the dough in the refrigerator allows the cookies to achieve crisp edges.
A constant 1/4-inch dough thickness results in uniformly shaped cookies during rolling because you should use even pressure. Place parchment paper on top of the surface to avoid sticking during rolling.
Constant observation will help prevent the cookies from becoming overcooked. Remove the cookies from the oven while their appearance is set with a fresh golden color. The cookies may become excessively crisp because of overlong baking.
The icing requires full drying before you touch or store the cookies to prevent smudging. Where the temperature remains cold and dry conditions the cookies will dry faster.
Work swiftly on the web design foundation using a toothpick because the icing remains wet. A well-made web design requires the use of a sharp toothpick or skewer to execute smooth movements during the process.
Creative Variations to Try
Chocolate Spider Web Cookies – Swap ½ cup of flour for unsweetened cocoa powder to create a rich, chocolate-flavored cookie base.
Flavored Icing – Enhance the icing with a few drops of almond, orange, or peppermint extract for a unique twist.
Colorful Web Designs involves using colored icing instead of standard black and white to generate eye-catching webs. Festive celebrations can be highlighted with orange purple or gold colored designs.
The cookies become compatible with gluten intolerance when you substitute them with a 1:1 gluten-free flour blend.
A multi-dimensional finish can be achieved through topping the cookies with crushed nuts and cookie crumbles or edible glitter before the icing solidifies.
Experiment with these ideas to make your spider web cookies truly your own. The following discussion provides information about the most effective methods for preparing and enjoying these beautiful pastries.
Serving Suggestions
Now that your spider web cookies are beautifully decorated and ready to enjoy, let’s talk about the best ways to serve them. The versatile treat goes nicely with multiple treats and suits different social events. The following ideas will show you how to enhance your experience with these creative serving methods.
Best Ways to Serve Spider Web Cookies
With a Cozy Drink – Pair these cookies with a steaming mug of cocoa, coffee, or herbal tea for a comforting treat.
On a Dessert Platter – Arrange them with chocolate-dipped fruit, macarons, or mini pastries for an eye-catching dessert display.
With Ice Cream – Enjoy them alongside a scoop of creamy vanilla, rich chocolate, or even caramel swirl for a delicious contrast.
As a Gift or Party Favor – Pack each cookie in a decorative bag or small gift box for a delightful homemade present.
Before serving bake the cookies with a drizzle of extra flavor made from melted chocolate, caramel or white chocolate.
Storage Tips to Keep Them Fresh
Store the cookies within airtight containers in locations which stay dry and also at room temperature. The cookies can stay fresh when properly stored for up to several days.
Warm temperatures require refrigeration of the cookies since it helps save the icing from melting.
Need to prepare cookies in advance? Freezing the cookies is a viable option. Wrap plain cookies with freezer-safe storage containers by inserting parchment paper between the layers. To prepare the cookies for decoration just thaw them at room temperature.
By following these tips, you can keep your spider web cookies fresh and flavorful, whether you enjoy them right away or save some for later!
Conclusion
Baking spider web cookies is a fun and rewarding way to create a treat that is both delicious and visually impressive. The preparation of this dish includes both artistic elements in decoration along with enjoyable taste experiences during mixing stages. You can use these cookies as homemade treats or prepare them for gatherings and they will surely serve as delightful snacks.
This particular baking method provides enjoyable versatility. Each different batch can be made unique through experimental techniques and flavor combinations and decorative elements when frosting. When stored properly these treats rest fresh after baking for many days.
The next step is putting your artistry into practice while preparing these cookies with all the guidance received. The key to this experience lies in keeping an open mind to creativity together with enjoying all your delicious creations.
Royal Icing: For more information about “royal icing,” click on the link royal icing.
Spider Web Cookies
Ingredients
For the Cookies:
- 2 ½ cups all-purpose flour for the perfect texture
- 1 cup unsalted butter softened (adds richness)
- ¾ cup granulated sugar for balanced sweetness
- 1 large egg helps bind the dough
- 2 teaspoons vanilla extract enhances flavor
- ½ teaspoon baking powder for a slight lift
- ¼ teaspoon salt balances sweetness
For the Spider Web Decoration:
- 1 cup powdered sugar for smooth icing
- 2 –3 tablespoons milk or water adjust for consistency
- ½ teaspoon vanilla or almond extract adds subtle flavor
- Black cocoa powder or melted dark chocolate for the web design
- Piping bag or toothpick for precise decorating
Optional Add-Ons:
- Food coloring to customize your icing
- Sprinkles or edible glitter for extra flair
Instructions
Step 1: Prepare the Dough
- In a large bowl, beat the softened butter and sugar together until smooth and creamy. This step helps achieve a light, melt-in-your-mouth texture.
- Crack in the egg, then add the vanilla extract, blending until fully incorporated.
- In another bowl, combine the flour, baking powder, and salt, stirring to evenly distribute the ingredients.
- Slowly mix the dry ingredients into the wet mixture, stirring just until a soft dough forms. Avoid overworking the dough to keep the cookies delicate.
- Wrap the dough in plastic wrap and refrigerate for at least 30 minutes—this makes it easier to roll out and prevents excessive spreading.
Step 2: Shape and Bake
- Set your oven to 350°F (175°C) and get a baking sheet ready by covering it with parchment paper or a non-stick mat.
- Lightly flour a clean surface, then roll out the dough to about ¼-inch thick for even baking.
- Use a round cutter or the rim of a glass to cut out circles, then gently transfer them onto the prepared baking sheet, leaving a bit of space between each.
- Slide the tray into the oven and bake for around 8–10 minutes, just until the edges are firm but not browned.
- Let the cookies rest on the tray for a minute or two before carefully placing them on a wire rack to cool completely.
Step 3: Decorate with a Spider Web Design
- In a small bowl, whisk together powdered sugar, milk, and vanilla extract until the icing reaches a smooth, pourable consistency. Add extra milk, a teaspoon at a time, if needed.
- Using a spoon or an offset spatula, spread a thin layer of icing over each cookie.
- For the web effect, take melted dark chocolate or black cocoa icing and pipe three or four circles over the icing.
- While the icing is still wet, drag a toothpick from the center outward at equal intervals to create a delicate web pattern.
- Let the cookies sit undisturbed until the icing has completely dried, ensuring a polished finish.
Video
Notes
- Prep Time: 20 minutes
- Chill Time: 30 minutes
- Cook Time: 10 minutes
- Total Time: 1 hour
- Servings: 24 cookies
- Calories: 180 kcal per cookie
FAQs About Spider Web Cookies
Here are answers to some of the most common questions about spider web cookies, helping you achieve the best results every time.
1. What are spider web cookies?
Spider web cookies are decorative sugar cookies with a delicate web pattern made from icing or melted chocolate. They are both delicious and visually appealing, making them a fun treat for any occasion.
2. Can I make spider web cookies without a piping bag?
Yes! If you don’t have a piping bag, you can use a resealable plastic bag with a tiny hole cut in one corner. Another option is using a toothpick to carefully drag icing into a web-like pattern.
3. How do I keep the icing from running off the cookies?
To prevent the icing from spreading too much, allow the cookies to cool completely before decorating. If needed, slightly thicken the icing by adding more powdered sugar until you reach the right consistency.
4. Can I use chocolate instead of icing for the spider web design?
Definitely! Melted chocolate or black cocoa powder mixed with a bit of liquid can be used to draw the web pattern. It adds a rich flavor and creates a striking contrast against the cookie base.
5. How long do spider web cookies stay fresh?
If stored in an airtight container at room temperature, spider web cookies remain fresh for about five days. If you want to keep them longer, refrigerate them or freeze them for up to two months.
6. Can I prepare the cookie dough ahead of time?
Yes, the dough can be made in advance. Wrap it tightly in plastic wrap and refrigerate it overnight to maintain freshness. Before rolling it out, let it sit at room temperature for a few minutes to soften slightly.
7. What type of icing works best for decorating spider web cookies?
Royal icing is ideal because it dries quickly and maintains a well-defined shape. Alternatively, a simple glaze made from powdered sugar and milk can work for a softer finish.
8. Can I make spider web cookies without gluten?
Yes! A gluten-free flour blend can replace traditional flour. The cookies may have a slightly different texture, but they will still turn out flavorful and delightful.
9. Why is my cookie dough difficult to roll out?
If the dough feels too sticky, chilling it for an extra 15–20 minutes can make it easier to handle. Lightly dusting your work surface with flour can also prevent sticking while rolling.
10. How can I make the web design more precise?
For a clean, intricate web effect, use a fine piping tip and apply steady pressure when piping. If needed, a toothpick or skewer can help refine the design by dragging icing into sharp lines.
With these tips, you’re ready to create perfectly decorated spider web cookies that taste just as amazing as they look!
Craving more chocolatey goodness? Check out our Hershey Recipes Chocolate Cookies for another irresistible treat!