

Who doesn’t love the smell of freshly baked chocolate rolls wafting through the kitchen? These indulgent treats are the perfect blend of soft, fluffy pastry and rich, velvety chocolate, making them an irresistible choice for breakfast, dessert, or a midday pick-me-up. Whether you’re looking to impress your loved ones with a homemade delight or simply treat yourself, chocolate rolls are a versatile and rewarding option. Best of all, they’re surprisingly easy to make! Let’s dive into this decadent recipe and bring a touch of bakery magic right to your home.
Table of Contents
Key Benefits of Chocolate Rolls
Chocolate rolls aren’t just a delicious treat—they also come with a host of benefits that make them a must-try in any kitchen. Here’s why these sweet, soft pastries are a favorite for many:
- Easy to Make: Despite their decadent taste, chocolate rolls are surprisingly simple to prepare. With a few basic ingredients and a little time, you can enjoy freshly baked chocolate rolls right at home.
- Versatile: These rolls can be customized with a variety of fillings or toppings. Whether you prefer milk chocolate, dark chocolate, or even a touch of hazelnut spread, the options are endless!
- Great for All Occasions: Whether you’re hosting a family brunch, preparing a weekend treat, or looking to impress friends at a gathering, chocolate rolls are perfect for any occasion. Their sweet aroma and rich taste make them a crowd-pleaser.
- Comforting & Indulgent: There’s something incredibly satisfying about biting into a warm, chocolate-filled pastry. Chocolate rolls are not only comforting but also elevate any meal with their rich, irresistible flavor.
Making chocolate rolls at home means you get to control the ingredients, ensuring they’re fresh and of the highest quality. So, whether you’re a seasoned baker or a newbie in the kitchen, these rolls are an accessible yet indulgent treat you’ll love to make and share.
Ingredients for Chocolate Rolls
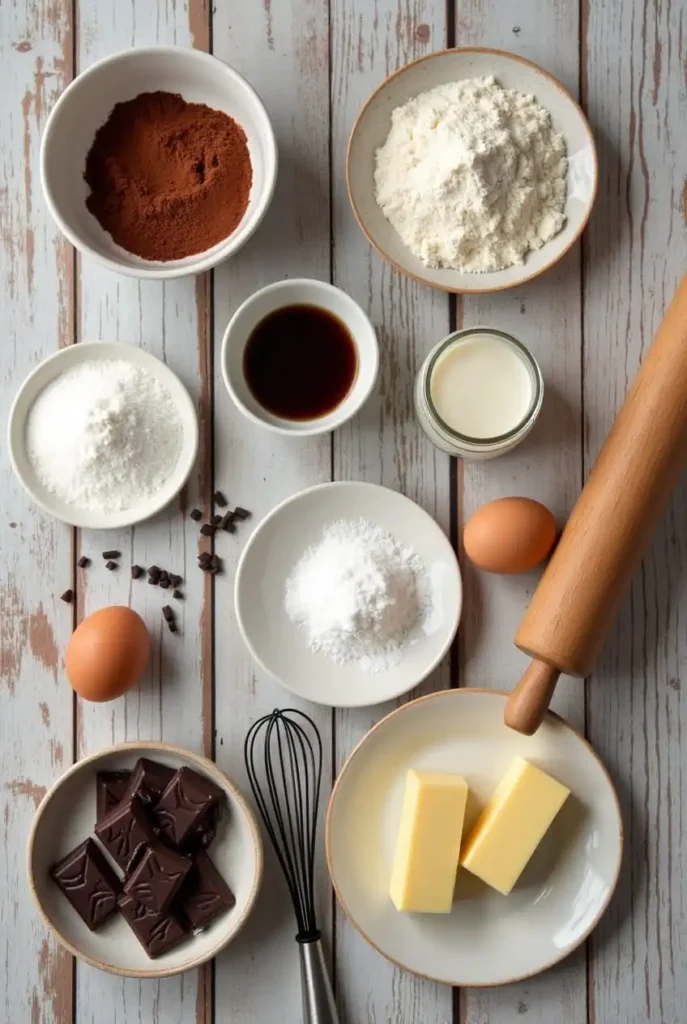
To make these indulgent chocolate rolls, you’ll need just a few key ingredients. Here’s what you’ll need to get started:
- 2 ½ cups all-purpose flour – The base for your dough, providing the perfect texture.
- ½ cup sugar – For a subtle sweetness that balances the rich chocolate filling.
- 1 packet (2 ¼ tsp) active dry yeast – This helps the dough rise and become light and fluffy.
- ½ cup warm milk – A warm liquid is essential to activate the yeast, ensuring your dough rises properly.
- ¼ cup butter, softened – For a rich, tender dough with a delicious buttery flavor.
- 1 large egg – Adds structure and helps bind the dough together.
- 1 tsp vanilla extract – A touch of vanilla enhances the flavor profile.
- 1 cup semi-sweet chocolate chips or chopped chocolate – The star ingredient! You can also experiment with dark chocolate or milk chocolate for different flavor variations.
- 2 tbsp cocoa powder – To deepen the chocolate flavor in the filling.
- ¼ cup brown sugar – Adds extra sweetness and a slight caramel flavor to the filling.
- Pinch of salt – Helps balance the sweetness and enhance the overall flavor.
Optional: You can also add chopped nuts like hazelnuts or walnuts for extra texture or a drizzle of chocolate glaze on top to make these rolls even more decadent.
With these ingredients in hand, you’re ready to create a batch of warm, gooey chocolate rolls that will fill your kitchen with an irresistible aroma. Now, let’s move on to the fun part—making the dough!
How To Make Chocolate Rolls
Creating chocolate rolls at home is a delightful and rewarding experience. Here’s your step-by-step guide to making these delicious pastries from scratch—perfect for breakfast, dessert, or any time you’re craving something sweet!
Step 1: Prepare the Dough
- Activate the yeast: Combine the warm milk and sugar in a small bowl, then sprinkle the yeast on top. Let it sit for 5-10 minutes, allowing it to bubble and activate before using.
- Mix the dry ingredients: In a large mixing bowl, whisk together the flour and salt. This helps evenly distribute the salt throughout the dough.
- Combine wet and dry ingredients: Make a well in the middle of the flour mixture and add the egg, softened butter, and the yeast mixture. Stir until a sticky dough forms.
- Knead the dough: Transfer the dough onto a floured surface and knead it with your hands for about 5-7 minutes, or until it’s smooth, soft, and elastic. If it’s too sticky, dust it lightly with more flour, but be careful not to overdo it—this will keep your rolls light and fluffy.
Step 2: Let the Dough Rise
- Rest the dough: Place the dough in a lightly greased bowl and cover it with a clean kitchen towel. Let it rise in a warm, draft-free area for about 1 hour, until it doubles in size. This is when the magic happens—your dough will become soft and airy!
Step 3: Prepare the Chocolate Filling
- Mix the filling ingredients: In a separate bowl, combine the chocolate chips (or chopped chocolate), cocoa powder, and brown sugar. This mixture will form a rich, gooey filling for the rolls.
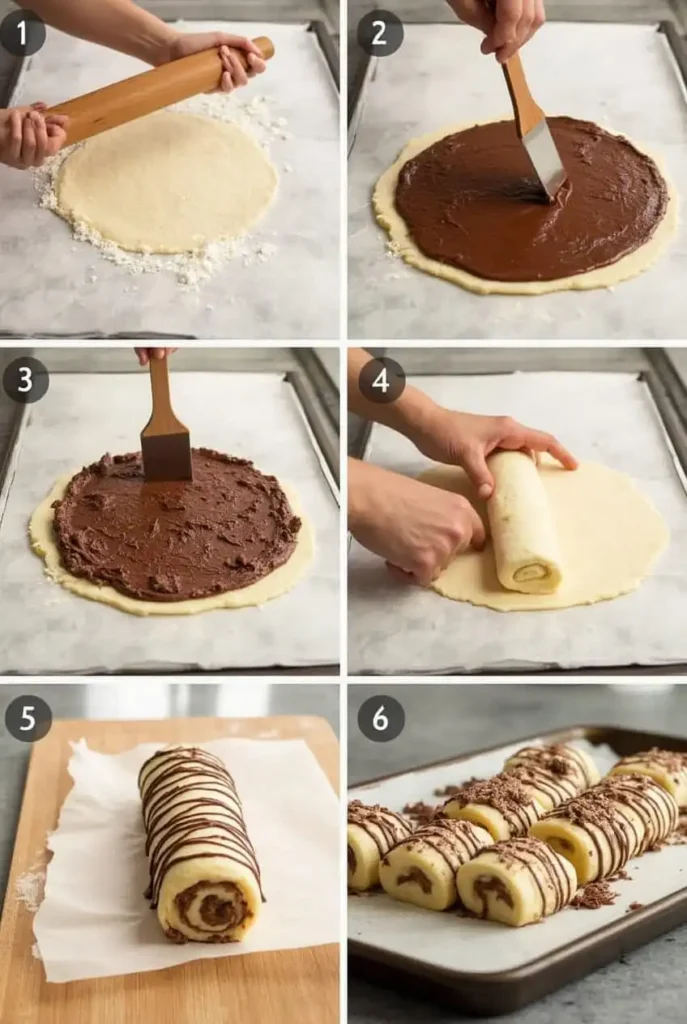
- Roll out the dough: Once the dough has risen, punch it down gently to release any air bubbles. Transfer it to a floured surface and roll it out into a rectangle about 12 inches by 18 inches. The dough doesn’t have to be perfect—just large enough to hold all that yummy chocolate filling.
Step 4: Fill the Rolls
- Spread the filling: Brush the rolled-out dough with melted butter, then evenly sprinkle the chocolate mixture on top. Make sure every inch is covered for that deliciously sweet chocolate filling in every bite.
- Shape the rolls: Starting at one edge, carefully roll the dough into a tight log, enclosing the chocolate filling inside.
- Cut the rolls: Using a sharp knife or dental floss, slice the dough into 10-12 equal pieces. These will be your individual chocolate rolls, ready to bake.
Step 5: Bake the Rolls
- Prepare the baking pan: Arrange the rolls in a greased 9×13-inch baking dish, placing them closely together. This will help them rise while baking, creating those soft, fluffy rolls everyone loves.
- Let them rise: Cover the rolls with a towel and let them rest for 30 minutes while the oven preheats to 350°F (175°C). The dough will rise a little more during this time.
- Bake: Pop the rolls into the oven and bake for 20-25 minutes, or until they’re golden brown and puffed up. You’ll know they’re ready when your kitchen is filled with the heavenly scent of chocolate and fresh dough!
Step 6: Cool and Serve
- Let them cool: Allow the rolls to cool for about 5 minutes before serving. This helps the chocolate filling set just enough so you can enjoy them without the mess!
- Optional glaze: For an extra touch of sweetness, drizzle a little chocolate glaze over the rolls once they’ve cooled slightly. It’s the perfect finishing touch for these indulgent treats!
With these simple steps, you’ll be able to create the most delicious, soft, and gooey chocolate rolls that will leave everyone wanting more. Whether you’re making them for a special occasion or just because, these rolls are sure to become a new favorite in your baking repertoire. Enjoy!
Pro Tips and Variations
Making chocolate rolls at home is a fun, rewarding experience, and with a few simple tricks, you can elevate your baking game. Here are some pro tips and creative variations to help you perfect your chocolate rolls, whether it’s your first time baking or you’re looking for new ways to make them your own.
Pro Tips for Perfect Chocolate Rolls
- Use Fresh Yeast: For the best results, always use fresh yeast that hasn’t expired. This ensures the dough rises properly and gives you soft, fluffy rolls every time.
- Room Temperature Ingredients: Before you start, make sure your butter and eggs are at room temperature. Cold ingredients can slow down the rising process and affect the texture of your rolls.
- Don’t Rush the Rise: Let the dough rise for the full time recommended in the recipe. Rising is crucial to achieving light and airy rolls. If your kitchen is cool, try placing the dough in a warm spot, like an oven with the light on.
- Knead the Dough Well: Kneading the dough until it’s smooth and elastic is key to achieving the perfect texture. If it feels sticky, dust it with a little more flour, but don’t overdo it. The dough should still be soft and slightly tacky.
- Evenly Roll the Dough: When you roll out the dough, aim for an even thickness. This helps ensure that the rolls bake uniformly and that the chocolate filling is evenly distributed.
- Check for Golden Perfection: Keep an eye on your rolls while they bake. They should be golden brown and slightly firm to the touch when done. If you overbake them, they could turn out dry, so start checking a few minutes before the time is up.
Creative Variations to Try
- Chocolate-Cinnamon Rolls: Spice things up by adding a teaspoon of cinnamon to the chocolate filling. The warm spice pairs wonderfully with the richness of the chocolate and adds a cozy twist to the rolls.
- Nutty Chocolate Rolls: Add some texture by sprinkling chopped nuts, like walnuts or hazelnuts, over the chocolate filling before rolling. The crunch balances perfectly with the soft dough and gooey chocolate.
- Peanut Butter Chocolate Rolls: For a rich, decadent twist, spread a layer of peanut butter over the dough before adding the chocolate filling. The blend of chocolate and peanut butter creates a mouthwatering treat.
- Fruit-Filled Rolls: For a fruity variation, swap out the chocolate for your favorite fruit preserves, such as raspberry or strawberry. The tangy fruit pairs beautifully with the soft dough for a fresh, sweet treat.
- Dairy-Free Option: If you’re avoiding dairy, simply use dairy-free butter and plant-based milk in place of traditional ingredients. The rolls will still be soft and delicious, with no compromise on flavor.
Glaze and Topping Ideas
- Chocolate Glaze: For an extra indulgent touch, drizzle a smooth chocolate glaze over the rolls after they cool slightly. It adds richness and a beautiful glossy finish.
- Cream Cheese Icing: If you prefer a tangy contrast, a simple cream cheese icing is perfect. Mix cream cheese, powdered sugar, and vanilla extract for a creamy, sweet topping.
- Simple Powdered Sugar Dusting: For a lighter touch, dust the rolls with powdered sugar just before serving. It’s an easy way to make your chocolate rolls look extra appealing without adding much more sweetness.
By following these tips and experimenting with these variations, you’ll find the perfect combination of flavors and textures to make your chocolate rolls uniquely yours. Enjoy the process and the sweet, comforting results!
Serving Suggestions
Now that your chocolate rolls are baked to perfection, it’s time to make them even more irresistible with some delicious serving suggestions. Whether you’re enjoying them for breakfast, as a dessert, or at a special gathering, these ideas will help you serve your chocolate rolls in style.
Classic Serve
For a classic serving, place your freshly baked chocolate rolls on a plate and dust them lightly with powdered sugar. This simple yet elegant touch enhances their visual appeal and adds just the right amount of sweetness without overwhelming the chocolate flavor.
Pair with Coffee or Tea
Chocolate rolls are the perfect companion for your morning coffee or afternoon tea. The richness of the chocolate, combined with the soft, pillowy texture of the dough, pairs wonderfully with a warm, comforting cup of coffee or tea. Whether it’s a bold espresso or a milder green tea, the combination is sure to delight your taste buds.
Serve with Ice Cream
For an indulgent treat, serve your chocolate rolls with a scoop of vanilla or chocolate ice cream on the side. The cold, creamy texture of the ice cream contrasts beautifully with the warm, gooey chocolate rolls. You can also drizzle some extra chocolate sauce or caramel over the top for added decadence.
Add Fresh Fruit
If you want to balance out the richness of the chocolate rolls, serve them with some fresh fruit like berries, sliced bananas, or even a drizzle of honey. The natural sweetness and tartness of the fruit add a refreshing contrast, making every bite a delightful experience.
Perfect for Brunch
These chocolate rolls are a great addition to any brunch spread. Serve them alongside savory dishes like scrambled eggs, bacon, or a fresh salad for a well-rounded meal. They’ll definitely be the star of the table, offering a sweet touch to your savory options.
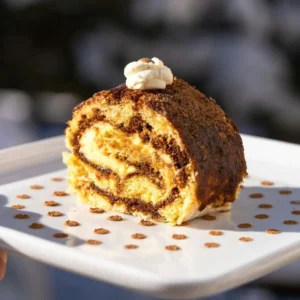
Transform Into a Chocolate Roll Cake
If you’re feeling extra creative, transform your chocolate rolls into a show-stopping chocolate roll cake. After baking and cooling, spread a layer of whipped cream or frosting over the rolls, roll them back up, and slice into beautiful swirls. This makes for a stunning dessert perfect for any celebration.
By using these serving ideas, you can enjoy your chocolate rolls in a variety of ways, from a simple treat to a decadent dessert. Whether you’re serving them for breakfast or as an after-dinner delight, these rolls will always be a crowd-pleaser!
Conclusion
Making chocolate rolls at home is more than just baking—it’s about creating moments of joy, sharing sweet indulgence, and discovering the magic of homemade treats. With this recipe, you’ve learned how to craft soft, fluffy rolls filled with gooey chocolate goodness, perfect for any occasion.
Whether you’ve stuck to the classic version or explored some creative variations, your chocolate rolls are sure to bring smiles to everyone who tastes them. The tips and techniques shared here ensure your baking experience is smooth and enjoyable, leaving you with results that rival bakery-quality treats.
Remember, the beauty of homemade baking lies in its adaptability—each batch can be customized to match your preferences, whether it’s adding a personal touch to the filling or experimenting with toppings. And don’t forget to savor the process as much as the final product. Baking is an art, and every roll you make is a masterpiece.
We hope this recipe inspires you to keep baking and spreading happiness, one chocolate roll at a time. If you’ve enjoyed this recipe or tried any variations, let us know in the comments below. Happy baking, and enjoy every delicious bite!
Chocolate Rolls Recipe Recap
Ingredients
- 2 ½ cups all-purpose flour – The base for your dough providing the perfect texture.
- ½ cup sugar – For a subtle sweetness that balances the rich chocolate filling.
- 1 packet 2 ¼ tsp active dry yeast – This helps the dough rise and become light and fluffy.
- ½ cup warm milk – A warm liquid is essential to activate the yeast ensuring your dough rises properly.
- ¼ cup butter softened – For a rich, tender dough with a delicious buttery flavor.
- 1 large egg – Adds structure and helps bind the dough together.
- 1 tsp vanilla extract – A touch of vanilla enhances the flavor profile.
- 1 cup semi-sweet chocolate chips or chopped chocolate – The star ingredient! You can also experiment with dark chocolate or milk chocolate for different flavor variations.
- 2 tbsp cocoa powder – To deepen the chocolate flavor in the filling.
- ¼ cup brown sugar – Adds extra sweetness and a slight caramel flavor to the filling.
- Pinch of salt – Helps balance the sweetness and enhance the overall flavor.
Instructions
Step 1: Prepare the Dough
- Activate the yeast: Combine the warm milk and sugar in a small bowl, then sprinkle the yeast on top. Let it sit for 5-10 minutes, allowing it to bubble and activate before using.
- Mix the dry ingredients: In a large mixing bowl, whisk together the flour and salt. This helps evenly distribute the salt throughout the dough.
- Combine wet and dry ingredients: Make a well in the middle of the flour mixture and add the egg, softened butter, and the yeast mixture. Stir until a sticky dough forms.
- Knead the dough: Transfer the dough onto a floured surface and knead it with your hands for about 5-7 minutes, or until it’s smooth, soft, and elastic. If it’s too sticky, dust it lightly with more flour, but be careful not to overdo it—this will keep your rolls light and fluffy.
Step 2: Let the Dough Rise
- Rest the dough: Place the dough in a lightly greased bowl and cover it with a clean kitchen towel. Let it rise in a warm, draft-free area for about 1 hour, until it doubles in size. This is when the magic happens—your dough will become soft and airy!
Step 3: Prepare the Chocolate Filling
- Mix the filling ingredients: In a separate bowl, combine the chocolate chips (or chopped chocolate), cocoa powder, and brown sugar. This mixture will form a rich, gooey filling for the rolls.
- Roll out the dough: Once the dough has risen, punch it down gently to release any air bubbles. Transfer it to a floured surface and roll it out into a rectangle about 12 inches by 18 inches. The dough doesn’t have to be perfect—just large enough to hold all that yummy chocolate filling.
Step 4: Fill the Rolls
- Spread the filling: Brush the rolled-out dough with melted butter, then evenly sprinkle the chocolate mixture on top. Make sure every inch is covered for that deliciously sweet chocolate filling in every bite.
- Shape the rolls: Starting at one edge, carefully roll the dough into a tight log, enclosing the chocolate filling inside.
- Cut the rolls: Using a sharp knife or dental floss, slice the dough into 10-12 equal pieces. These will be your individual chocolate rolls, ready to bake.
Step 5: Bake the Rolls
- Prepare the baking pan: Arrange the rolls in a greased 9×13-inch baking dish, placing them closely together. This will help them rise while baking, creating those soft, fluffy rolls everyone loves.
- Let them rise: Cover the rolls with a towel and let them rest for 30 minutes while the oven preheats to 350°F (175°C). The dough will rise a little more during this time.
- Bake: Pop the rolls into the oven and bake for 20-25 minutes, or until they’re golden brown and puffed up. You’ll know they’re ready when your kitchen is filled with the heavenly scent of chocolate and fresh dough!
Step 6: Cool and Serve
- Let them cool: Allow the rolls to cool for about 5 minutes before serving. This helps the chocolate filling set just enough so you can enjoy them without the mess!
- Optional glaze: For an extra touch of sweetness, drizzle a little chocolate glaze over the rolls once they’ve cooled slightly. It’s the perfect finishing touch for these indulgent treats!
Video
Notes
- Prep Time: 20 minutes
- Cook Time: 25 minutes
- Total Time: 2 hours (including rising time)
- Servings: 12 rolls
- Calories: 250 per serving
FAQs About Chocolate Rolls
Here are some frequently asked questions to help you troubleshoot or refine your chocolate roll-making process. These answers will ensure your rolls turn out perfect every time!
1: Why didn’t my dough rise properly?
This issue is often related to yeast. Ensure your yeast is fresh and active by proofing it in warm liquid before mixing. Also, keep the dough in a warm, draft-free area to help it rise.
2: How do I prevent my filling from leaking out?
To prevent leaks, avoid overfilling the dough with chocolate and ensure you roll the dough tightly but gently. Pinch the seams well and place the rolls seam-side down on the baking tray.
3: Can I prepare the dough in advance?
Yes, you can prepare the dough the night before and refrigerate it after the first rise. Let it come to room temperature and rise slightly before shaping and baking.
4: What can I use as a substitute for dairy products?
If you’re avoiding dairy, you can substitute plant-based milk and use vegan butter. They work wonderfully to create soft and delicious rolls without compromising flavor.
5: How do I store leftover chocolate rolls?
To keep the rolls fresh, place them in an airtight container and store them at room temperature for up to two days. For extended storage, refrigerate for up to a week or freeze them. Reheat gently before serving to restore their warm, bakery-fresh flavor.
6: Can I use dark chocolate instead of milk chocolate?
Absolutely! Dark chocolate adds a richer and slightly less sweet flavor, which pairs beautifully with the soft dough. You can also mix milk and dark chocolate for a balanced taste.
7: What’s the best way to reheat chocolate rolls?
Reheat rolls in the microwave for 15-20 seconds or in a 300°F (150°C) oven for a few minutes until warm. This will restore their soft and gooey texture.
These FAQs address common concerns and offer practical solutions, so you can bake chocolate rolls with confidence every time!