

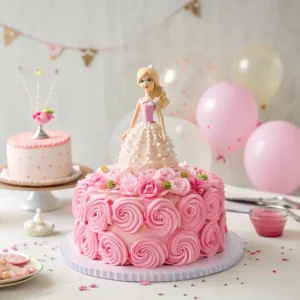
A Barbie birthday cake is the perfect centerpiece for a celebration, especially for kids who love Barbie. This beautifully designed Barbie cake not only looks stunning but also brings joy to any Barbie birthday party. Whether you’re making it for your daughter’s 7th birthday or a special event, this cake will make the day extra memorable.
With a Barbie doll cake, you can create a dress-shaped design using cake layers and buttercream frosting. The process is simpler than it looks, and with the right tools, you can make a themed cake that stands out. You don’t need advanced cake decorating skills—just a little creativity and patience.
In this guide, you’ll learn how to make a Barbie birthday cake step by step, from preparing the cake batter to decorating the final cake dress. Whether you’re using a box cake mix or making it from scratch, this tutorial will help you achieve a beautiful and delicious result.
Table of Contents
Key Benefits of Barbie Birthday Cake
Making a Barbie birthday cake at home isn’t just about baking—it’s about creating a magical moment. Whether you’re surprising your little one or making a special cake for a Barbie-loving friend, this cake is guaranteed to steal the show.
1. You Can Make It Your Own
One of the best things about a Barbie doll cake is how easy it is to customize. Want a pink Barbie dress? Go for it! Prefer something sparkly or a Rapunzel-style cake? That works too. You get to decide the colors, patterns, and decorations, making it as simple or elaborate as you want.
2. It’s the Ultimate Party Cake
If you’re throwing a Barbie birthday party, this cake will be the centerpiece everyone talks about. Kids love the idea of an actual Barbie doll standing in the middle of a cake, dressed in layers of delicious frosting. Plus, it makes for some adorable pictures!
3. You Don’t Need to Be a Cake Decorating Expert
Even if you’ve never decorated a cake before, don’t worry—this one is totally doable. You can bake the cake in a bundt pan or stack cake layers to form the skirt shape. A simple star tip is all you need to pipe ruffles or rosettes onto the dress. It’s one of those cakes that looks impressive but is surprisingly easy to pull off.
4. Homemade Tastes Better
Store-bought cakes are convenient, but nothing beats the taste of a fresh, homemade cake. Whether you go for classic vanilla, chocolate, or even a mix of both, you’ll end up with a cake that’s not only beautiful but also delicious. And if you make a homemade buttercream frosting, it’ll be even better—creamy, rich, and just the right amount of sweet.
5. It’s More Affordable Than You Think
Ordering a custom Barbie theme cake from a bakery can be pricey. But when you make it yourself, you can get that same gorgeous look for a fraction of the cost. Using box cake mix or a simple cake recipe, plus a few decorations, you can create something spectacular without spending a fortune.
At the end of the day, making a Barbie birthday cake is about more than just baking—it’s about creating something special, a cake that brings smiles and happy memories. And the best part? You get to enjoy a slice of your own masterpiece!
Ingredients for Barbie Birthday Cake Recipe
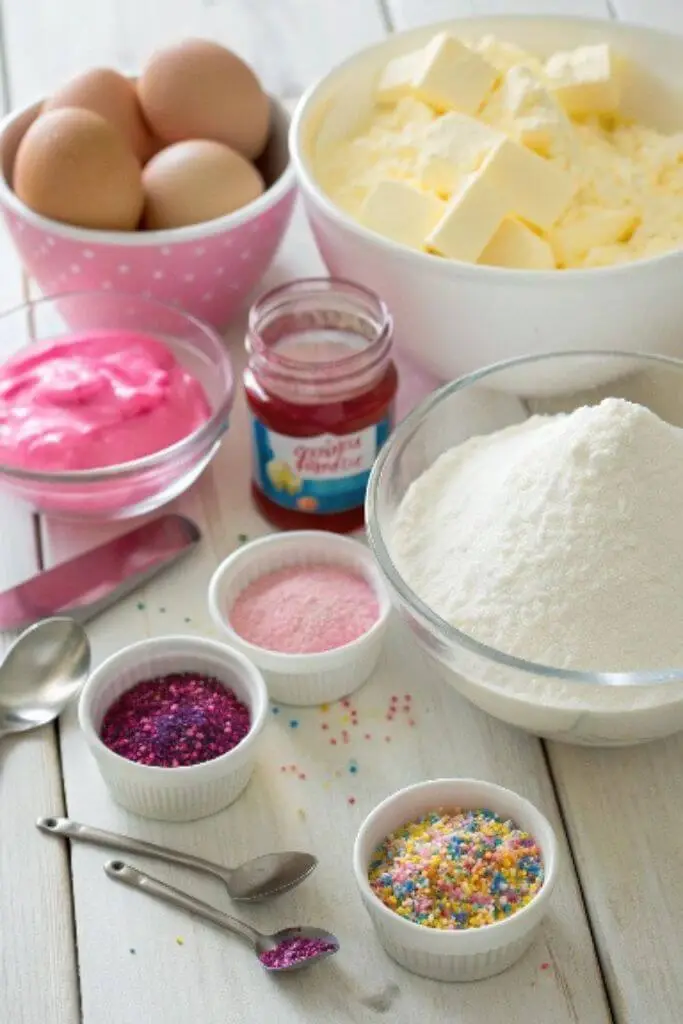
Alright, let’s get to the fun part—gathering everything you need to make this Barbie birthday cake! You can totally keep it simple with a box cake mix (because who doesn’t love a shortcut now and then?), or you can go the full-on homemade route if you’re feeling extra. Either way, you’re going to need a few basic ingredients to get the cake base and frosting just right.
For the Cake:
- 2 boxes of cake mix (I usually go for vanilla, but chocolate works great too)
- Eggs, oil, and water (just follow the cake mix instructions)
- 1 cup of milk (I always add milk instead of just water—it makes the cake so much fluffier)
- 1 teaspoon vanilla extract (because let’s be real, vanilla makes everything better)
- 2 round cake pans (I like to use 8 or 9-inch ones, but you can use whatever you’ve got) OR a bundt pan (for a cool, skirt-shaped effect)
For the Buttercream Frosting:
- 2 cups unsalted butter, softened (don’t try to use margarine here—real butter is key!)
- 6 cups powdered sugar (yep, it’s a lot, but trust me, this frosting is worth it)
- 1/4 cup heavy cream or milk (use heavy cream if you want it extra dreamy)
- 2 teaspoons vanilla extract (or almond extract if you’re feeling adventurous)
- Pink food coloring (or whatever color fits your Barbie theme)
For Decorating:
- 1 Barbie doll (just make sure to wrap her lower half in plastic wrap—we don’t want to ruin her outfit)
- Piping bags with a star tip (these make your frosting look so fancy—plus, rosettes are a breeze to make)
- Sprinkles, edible pearls, or glitter (optional, but who doesn’t love a little sparkle?)
- A cake stand or plate (to make it look extra special when you’re ready to show it off)
How to Make Barbie Birthday Cake
Now, let’s get into the fun part—baking and decorating this Barbie birthday cake! Whether you’re a seasoned baker or just starting out, you’ll find this process enjoyable and pretty easy to follow.
Step 1: Bake the Cake Layers
Start by baking the cake layers. If you’re using a box cake mix, just follow the instructions on the box. I always like to swap out the water for milk to give the cake a richer texture, and I throw in a bit of vanilla extract for extra flavor. Once your batter is mixed, divide it evenly between your greased cake pans and pop them into the oven.
To check if the cakes are finished, gently insert a toothpick into the center of the cakes. If it comes out clean, they’re ready! This should take about 25 minutes, but baking times can vary depending on your oven. After they’ve baked, let them cool in the pans for about 10 minutes, then turn them out onto a wire rack to cool completely.
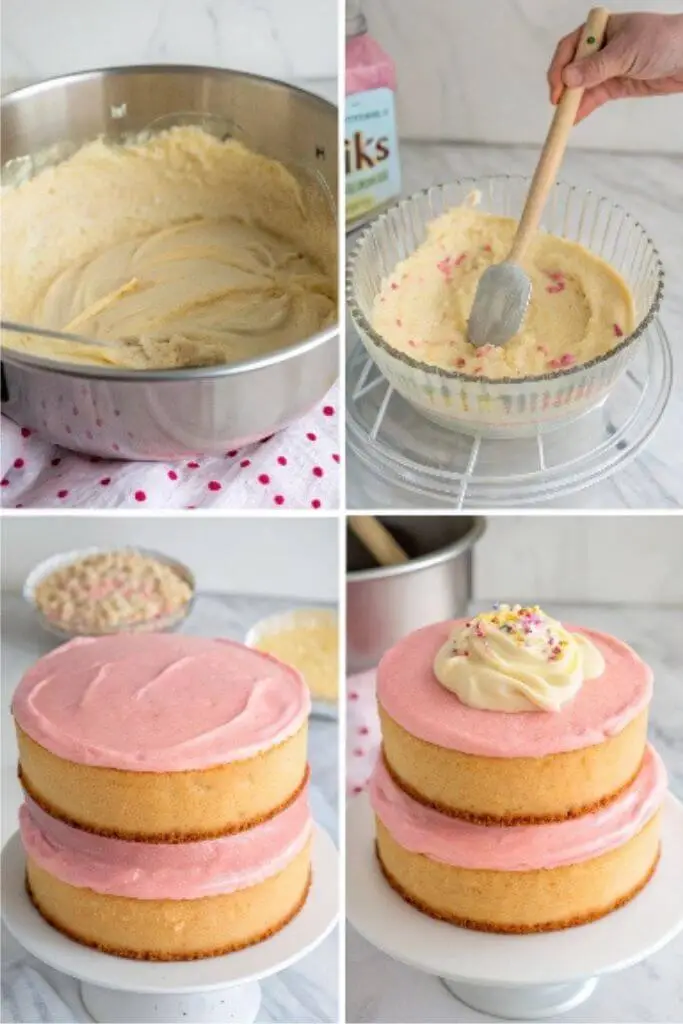
Step 2: Make the Buttercream Frosting
While the cakes cool, whip up your frosting. For the buttercream, beat the softened butter until smooth, then gradually add the powdered sugar, one cup at a time. You can add a splash of milk to get the perfect consistency—just make sure it’s spreadable but not too runny.
Once the frosting is nice and smooth, add a little vanilla extract for flavor, and a few drops of pink food coloring to give it that gorgeous Barbie pink shade. Mix it up until you get your desired color.
Step 3: Stack and Frost the Cake
After your cakes have cooled, it’s time to start putting everything together. Place the first cake layer on a cake stand or large plate. Spread a generous amount of frosting on top, covering it evenly.
Add the second cake layer on top, and now we’re going to do something called a crumb coat. Spread a thin layer of frosting over the entire cake to lock in the crumbs. After this, pop the cake into the fridge for about 10-15 minutes to let the crumb coat firm up.
Once the crumb coat is set, take the cake out and apply a thicker layer of frosting all over the cake. You can make it smooth or use a piping bag to add some pretty details, like rosettes or ruffles around the bottom.
Step 4: Add Barbie
Now comes the best part—adding Barbie! Wrap the lower half of your Barbie doll in plastic wrap to protect her, and carefully place her in the center of the cake. Make sure she’s standing up straight.
If Barbie is a little wobbly, you can use some extra frosting around her waist to hold her in place. Don’t stress if things get a little messy—it’s all part of the fun!
Step 5: Decorate
Now, let your creativity shine! You can decorate Barbie’s “dress” with more frosting or add fun touches like sprinkles, edible pearls, or glitter to make her sparkle. The more, the better!
Once you’re happy with the way your cake looks, take a step back and admire your beautiful Barbie birthday creation. It’s sure to be a hit at the party!
Pro Tips and Variations
Okay, so you’ve decided to make a Barbie birthday cake. The upcoming project will deliver delightful results in both taste and appearance. Creativity truly sets in after deciding the foundation of your creation. This moment gives you free rein to experiment with different flavors combined with colors while mastering various shapes. It’s kind of like being a kid again, but this time you’re baking. So, let me share a few tips and tricks I’ve learned along the way that will take your cake from “good” to “wow!”
Tip 1: Two Layers = Extra Fun
You know how Barbie’s always got that fabulous, fancy vibe? Well, why not give her cake the same treatment? Instead of a single-layer cake, go for two! It’s not that much harder, but it gives you extra space for frosting and makes everything feel more special. Plus, you can sneak in a fun filling between the layers—think jam, whipped cream, or custard. My personal favorite? A little swirl of Nutella—trust me, your guests will love it.
Tip 2: Barbie’s Dress Doesn’t Have to Be Basic
Now, if you’re gonna make a Barbie cake, you have to go all out with the dress. I mean, that’s the fun part, right? Grab a piping bag and a star tip (it’s the one that looks like a little star on the end), and just go wild with ruffles and rosettes. Don’t hold back! If you’re going for a smoother look, fondant is your best friend—yeah, it takes a bit more time, but it’s so worth it if you want Barbie’s gown to look all sleek and polished. And hey, if you’re really feeling extra, add a little edible glitter or mini pearls. It’s like adding jewelry to the cake.
Tip 3: Have Fun with a Theme
Okay, confession time: I love themes. When I made my first Barbie cake, I went all out and picked a Barbie as Rapunzel theme. You don’t have to do that, but you could totally make her dress a little more whimsical by adding flowers or sparkles. Or, if your kiddo’s into Barbie’s Princess Adventure, go for a regal look with a tiara on top and some extra shine. It’s your cake—why not make it as fun as the birthday girl?
Tip 4: Don’t Be Afraid to Add Some Color
Listen, Barbie’s all about the bold pinks and fun colors, so don’t skimp on the vibrancy. You can take this cake to the next level with some ombre frosting—just start with a deep pink at the bottom and fade to a lighter shade at the top. Or, get creative with swirling different colored frostings together for that marbled look. It’s like art, but edible. Every time I try a new color combo, I can’t help but feel like a cake artist.
Tip 5: Switch Up the Flavors
I’ll be honest, I’m a huge fan of classic vanilla and chocolate, but sometimes, you gotta mix things up a little. Have you ever tried a strawberry cake? It’s like summer in a bite. Or, if you’re feeling fancy, go for a funfetti cake with all those little colorful sprinkles hidden inside—it’s such a surprise when you cut into it! But, hey, if you’re a chocolate lover (guilty as charged), why not try a chocolate fudge cake for that ultra-decadent vibe? The best part? You can totally make it all about what you and your loved ones enjoy.
Tip 6: Make It Ahead of Time
Listen, I get it—birthday party prep can be a whirlwind. So, if you’re stressing about getting everything ready last minute, make the cake ahead of time! You can bake the layers and frost them the day before the party, then store the whole thing in an airtight container. Easy peasy. If you want, wrap the cake layers in plastic wrap to keep them fresh. Trust me, this is one of my favorite hacks for party planning stress relief.
Tip 7: Allergy-Friendly Options
I have transformed many recipes to comply with allergies numerous times in the past and every adaptation was fully worth it. Rephrase this sentence to maintain direct flow while making it easy to understand along with verbalizing when possible the information. The market contains numerous exceptional gluten-free flour alternatives while dairy-free butter and milk products function remarkably well. Neither the taste nor the appearance will change since the final outcome will be delicious without anyone being able to detect the differences.
Look, this Barbie birthday cake is supposed to be fun, so go ahead—get creative! Every person should personalize their design because creating something you love remains the priority. When you bake this treat you will experience the joy of being a party-going child while my prediction is that you will share my same excitement. So, what are you waiting for? Fly all the frosting and glitter towards your creation!
Serving Suggestions for Barbie Birthday Cake
Okay, now that you’ve baked this gorgeous Barbie birthday cake, let’s talk about how to serve it in style. The cake deserves a little extra attention, don’t you think? There’s something about presenting it that makes the whole party feel a bit more magical. Let’s make sure it’s not just about the cake’s taste but also how it looks on the table.
1. Cake Stand Magic
First thing’s first: get yourself a cake stand. A simple cake stand can make the whole dessert look so much more elevated—pun intended! It doesn’t have to be anything fancy, but something that lifts the cake up makes it feel like it’s the centerpiece. If you’re all in on the Barbie theme, go for a stand with a little bit of sparkle, or even something in a fun pastel color to match the vibe. Maybe toss a few little Barbie figurines around the base for a cute touch. Trust me, it’ll look amazing.
2. Mini Pieces for Little Hands
Let’s be real—if you’ve got kids around, cutting the cake into smaller, bite-sized pieces can make things way easier. Plus, it gives you the chance to serve more people without anyone feeling like they’re missing out on the fun. A little sprinkle of colored sugar or frosting on top of each mini slice can make it look super fun. Small cakes are always a hit—they’re cute, easy to grab, and they give you the chance to have just a little taste of everything.
3. Ice Cream, Anyone?
You can’t go wrong with serving a side of ice cream with this Barbie cake. I mean, cake and ice cream is like peanut butter and jelly—they just go together. A scoop of vanilla or strawberry ice cream beside a slice of cake will make everything feel a bit more decadent. If you’re feeling like a rockstar, set up an ice cream bar with toppings like sprinkles, chocolate syrup, or whipped cream. Let everyone make their own ice cream masterpiece.
4. Sparkle It Up
Okay, I’m all about adding a little bit of glitter to the mix. Seriously, just a tiny sprinkle of edible glitter on the cake and you’ll have yourself a real showstopper. Barbie loves sparkles, right? A dash of glitter, or even sugar crystals, will catch the light and make the cake feel like it’s part of some enchanted Barbie dreamland. If you really want to go all out, you could even throw on some gold leaf. But hey, that’s only if you’re feeling fancy!
5. Barbie Doll Centerpiece
If you want to really wow your guests, do the classic Barbie cake move—stick a Barbie doll right in the middle. It’s like the ultimate Barbie cake hack. You can dress her up with frosting to create a skirt or dress, and you’re basically turning the cake into a Barbie dress cake. Kids will be in awe, and it’s fun for adults too! Plus, once you remove the doll, you’ve got yourself a lovely cake with a sweet memory attached to it.
6. Cake Pops, Because Why Not?
Alright, so if you’ve got some extra cake on hand (and honestly, who doesn’t?), try turning it into cake pops. They’re fun, bite-sized, and totally customizable. You can mix leftover cake with frosting, roll it into little balls, dip them in candy melts, and decorate them like mini Barbie cakes. These are perfect for party favors or just handing out to anyone who might want a little extra treat.
7. Send Them Home with Cake
Want to keep the party going after it’s over? Send your guests home with a slice of cake! Just wrap each slice in some cute wax paper or place it in a little Barbie-themed box. Not only does it make a sweet party favor, but it’s also a nice way to make sure everyone gets a little piece of the magic to enjoy later.
No matter how you decide to serve your Barbie birthday cake, just remember to have fun with it. The cake is a celebration in itself, so let it shine! Whether it’s on a fancy cake stand, paired with ice cream, or surrounded by sparkles, the important thing is that it brings joy and adds to the excitement of the party.
Conclusion for Barbie Birthday Cake Recipe
And there you have it—the perfect Barbie birthday cake to make any party unforgettable. The entire process of preparing this cake involves creative decoration techniques along with fluffy batter mixing that delivers excitement to every celebration. Any party featuring this centerpiece will draw attention as the main attraction because it serves little ones on special days as well as Barbie-themed celebrations.
This particular cake design allows you to modify it according to your creative ideas. The level of complexity in your cake rests entirely on your creativity because you have total freedom to make it basic or elaborate. The most essential elements for this cake are its enjoyment along with its flavorful taste since it serves as a memory-making creation. Your cake will be a worthwhile challenge because every person at the celebration will love both admiring and enjoying your creation.
The key ingredients include your baking materials along with a Barbie doll topper while your creative spirit guides your baking masterpieces. You will enjoy making this edible piece because the entire experience leads to entertainment. Your creation should be enjoyed while the cake glorifies your preparation as you spread joy across everyone when they partake in your masterpiece. Happy baking on your journey to create eternal memories with each piece of cake.
Interested in learning more about the legal side of incorporating iconic elements like Barbie dolls into your cake designs? Dive deeper into the topic with Marquette University Law School’s insightful article on intellectual property in cake design. It’s a must-read for anyone curious about the legal considerations behind cake art!
Barbie Birthday Cake
Ingredients
For the Cake:
- 2 boxes of cake mix I usually go for vanilla, but chocolate works great too
- Eggs oil, and water (just follow the cake mix instructions)
- 1 cup of milk I always add milk instead of just water—it makes the cake so much fluffier
- 1 teaspoon vanilla extract because let’s be real, vanilla makes everything better
- 2 round cake pans I like to use 8 or 9-inch ones, but you can use whatever you’ve got OR a bundt pan (for a cool, skirt-shaped effect)
For the Buttercream Frosting:
- 2 cups unsalted butter softened (don’t try to use margarine here—real butter is key!)
- 6 cups powdered sugar yep, it’s a lot, but trust me, this frosting is worth it
- 1/4 cup heavy cream or milk use heavy cream if you want it extra dreamy
- 2 teaspoons vanilla extract or almond extract if you’re feeling adventurous
- Pink food coloring or whatever color fits your Barbie theme
For Decorating:
- 1 Barbie doll just make sure to wrap her lower half in plastic wrap—we don’t want to ruin her outfit
- Piping bags with a star tip these make your frosting look so fancy—plus, rosettes are a breeze to make
- Sprinkles edible pearls, or glitter (optional, but who doesn’t love a little sparkle?)
- A cake stand or plate to make it look extra special when you’re ready to show it off
Instructions
Step 1: Bake the Cake Layers
- Start by baking the cake layers. If you’re using a box cake mix, just follow the instructions on the box. I always like to swap out the water for milk to give the cake a richer texture, and I throw in a bit of vanilla extract for extra flavor. Once your batter is mixed, divide it evenly between your greased cake pans and pop them into the oven.
- To check if the cakes are finished, gently insert a toothpick into the center of the cakes. If it comes out clean, they’re ready! This should take about 25 minutes, but baking times can vary depending on your oven. After they’ve baked, let them cool in the pans for about 10 minutes, then turn them out onto a wire rack to cool completely.
Step 2: Make the Buttercream Frosting
- While the cakes cool, whip up your frosting. For the buttercream, beat the softened butter until smooth, then gradually add the powdered sugar, one cup at a time. You can add a splash of milk to get the perfect consistency—just make sure it’s spreadable but not too runny.
- Once the frosting is nice and smooth, add a little vanilla extract for flavor, and a few drops of pink food coloring to give it that gorgeous Barbie pink shade. Mix it up until you get your desired color.
Step 3: Stack and Frost the Cake
- After your cakes have cooled, it’s time to start putting everything together. Place the first cake layer on a cake stand or large plate. Spread a generous amount of frosting on top, covering it evenly.
- Add the second cake layer on top, and now we’re going to do something called a crumb coat. Spread a thin layer of frosting over the entire cake to lock in the crumbs. After this, pop the cake into the fridge for about 10-15 minutes to let the crumb coat firm up.
- Once the crumb coat is set, take the cake out and apply a thicker layer of frosting all over the cake. You can make it smooth or use a piping bag to add some pretty details, like rosettes or ruffles around the bottom.
Step 4: Add Barbie
- Now comes the best part—adding Barbie! Wrap the lower half of your Barbie doll in plastic wrap to protect her, and carefully place her in the center of the cake. Make sure she’s standing up straight.
- If Barbie is a little wobbly, you can use some extra frosting around her waist to hold her in place. Don’t stress if things get a little messy—it’s all part of the fun!
Step 5: Decorate
- Now, let your creativity shine! You can decorate Barbie’s “dress” with more frosting or add fun touches like sprinkles, edible pearls, or glitter to make her sparkle. The more, the better!
Video
Notes
- Prep Time: 30 minutes
- Cook Time: 25-30 minutes
- Total Time: 1 hour (including cooling and decorating)
- Servings: 10-12
- Calories per Serving: Approximately 350-400 kcal (depending on frosting and cake layers)
FAQs about Barbie Birthday Cake
Can I make this Barbie birthday cake ahead of time?
Absolutely! In fact, this cake can be baked a day or two before the party. Just make sure to wrap it tightly in plastic wrap or store it in an airtight container to keep it fresh. When you’re ready to serve, just add your frosting and decorations!
What if I don’t have a Barbie doll for the topper?
No problem! You can get creative with the topper—use a different doll or even go with a fun Barbie-themed decoration, like a pink flower, a mini crown, or a plastic tiara. The options are endless, so just have fun with it!
Can I use a different flavor for the cake?
Definitely! While vanilla is a classic choice, feel free to swap it out for chocolate, strawberry, or any other flavor your birthday girl (or boy) loves. You could even try fun flavors like funfetti or lemon for a twist.
Can I make this cake gluten-free or dairy-free?
Yes, you can! There are plenty of gluten-free and dairy-free cake mixes available, or you can use your favorite recipes to make adjustments. Just be sure to check that all your frosting ingredients align with the dietary restrictions you need.
How do I keep the Barbie topper from tipping over?
To keep the Barbie doll from tipping over, make sure to insert the doll securely into the middle of the cake. You can also use a little bit of frosting as glue to help stabilize it. If you’re using a two-layer cake, place the doll in the top layer, so it’s more stable.
Can I make the Barbie birthday cake a two-tier cake?
Yes, you can! A two-tier cake would add extra wow factor to your Barbie-themed birthday. Just stack the layers carefully and make sure the top layer is sturdy. Use dowels or straws for extra support if you’re stacking a heavy top layer.
Feel free to experiment and make this cake your own! There’s no right or wrong way to celebrate with this Barbie cake—it’s all about having fun and creating something special. Happy baking!
Ready to make your own Stitch birthday cake? Click here for fun design ideas and decorating tips!