
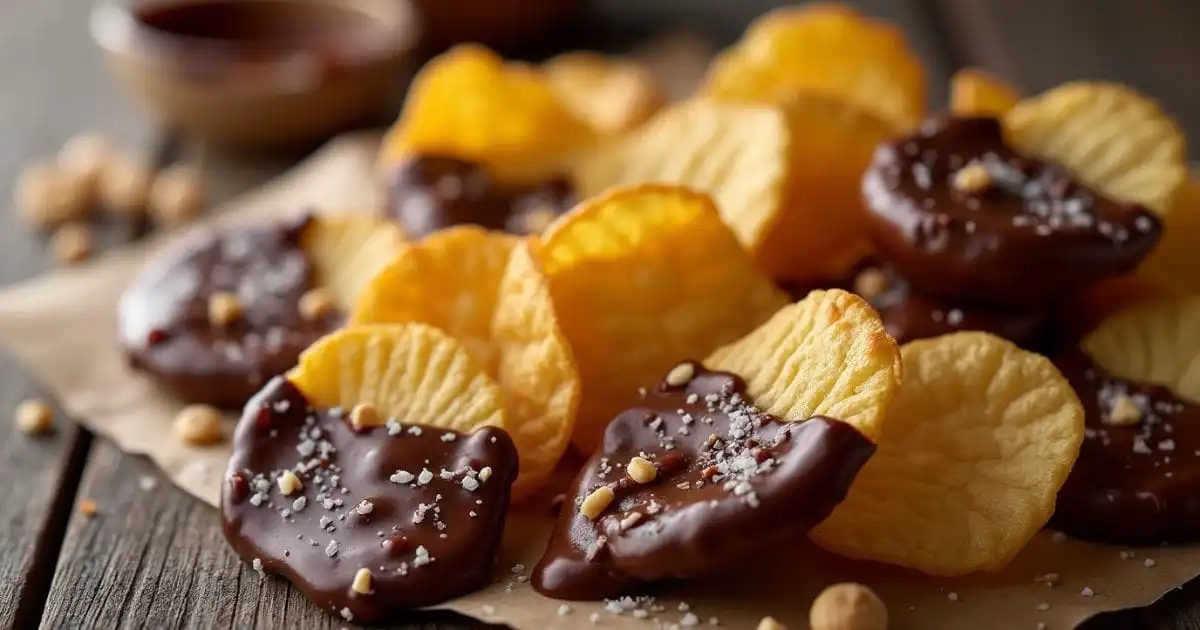
Have you ever craved a snack that perfectly balances sweet and salty in every bite? Look no further than these irresistible chocolate covered chips! Whether you’re hosting a party, surprising your kids, or simply treating yourself, this easy no-bake dessert is a guaranteed crowd-pleaser. Imagine crispy, salty potato chips coated in rich, velvety chocolate—sounds dreamy, right? The best part? You can customize it with your favorite chocolate (dark, milk, or white) and toppings to make it uniquely yours. Ready to whip up a batch of this homemade treat that’s as fun to make as it is to eat? Let’s dive in!
Table of Contents
Key Benefits
If you’re looking for a snack that’s equal parts indulgent and easy to make, chocolate covered chips are your answer. Here’s why this recipe is a must-try:
- Quick and Effortless: No baking required! With just a few simple steps, you can create a dessert that feels gourmet without the hassle.
- Sweet and Salty Perfection: The combination of crispy, salty chips and rich, smooth chocolate is a match made in snack heaven.
- Customizable: Whether you prefer dark chocolate, milk chocolate, or even white chocolate, this recipe adapts to your taste. Add toppings like crushed nuts, sprinkles, or a drizzle of caramel for extra flair.
- Crowd-Pleaser: Perfect for parties, movie nights, or even as a thoughtful homemade gift, these treats are sure to impress.
- Kid-Friendly: Get the little ones involved! Dipping chips in chocolate is a fun activity that results in a delicious reward.
This recipe isn’t just about satisfying your cravings—it’s about creating a snack that’s as versatile as it is delicious. Whether you’re a seasoned chef or a beginner in the kitchen, chocolate covered chips are a foolproof way to bring joy to your table. Ready to get started? Let’s gather your ingredients!
Ingredients
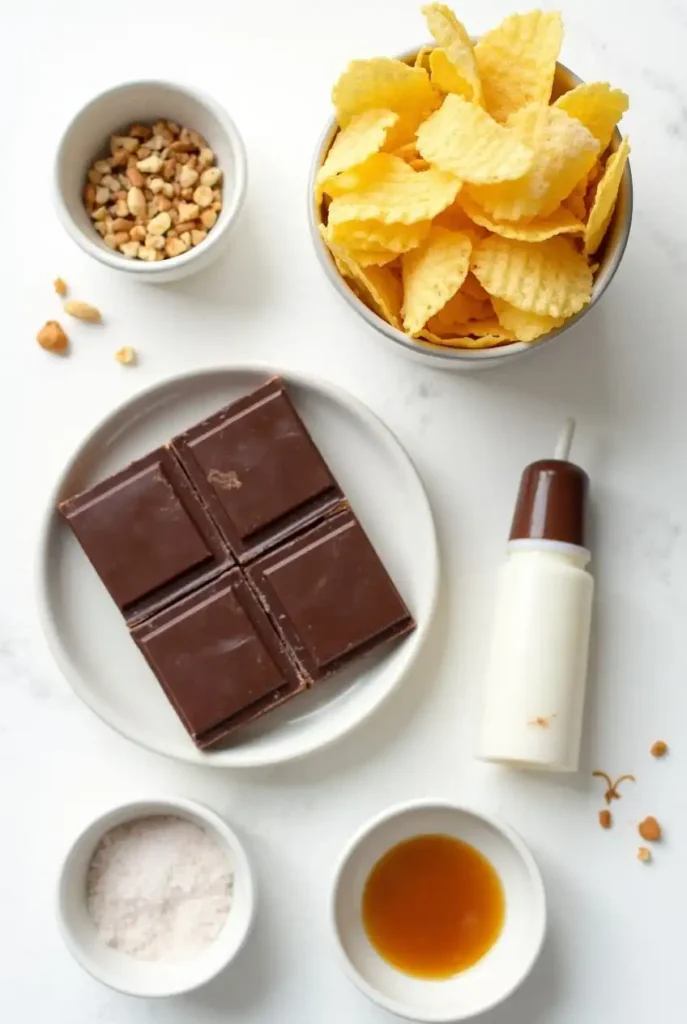
Gathering the right ingredients is the first step to creating your chocolate covered chips. Here’s everything you’ll need to make this sweet and salty treat:
- Potato Chips: 4 cups of sturdy, ridged chips (like kettle-cooked) for the perfect crunch.
- Chocolate: 12 oz of high-quality chocolate—choose dark chocolate for a rich flavor, milk chocolate for a sweeter taste, or white chocolate for a creamy twist.
- Toppings (Optional):
- Crushed nuts (almonds, peanuts, or pecans)
- Sprinkles or colored sugar
- Sea salt flakes for an extra salty kick
- Caramel or peanut butter drizzle
Pro Tip: Use chocolate chips or baking bars for easy melting. Avoid chocolate chips with added wax, as they can affect the texture.
With these simple ingredients, you’re just a few steps away from creating a snack that’s as fun to make as it is to eat. Ready to turn these basics into something extraordinary? Let’s move on to the step-by-step instructions!
How To Make Chocolate Covered Chips
Ready to whip up a batch of chocolate covered chips that’s equal parts fun and delicious? Let’s dive into the step-by-step process to create this sweet-and-salty treat that’s perfect for any occasion.
Step 1: Prep Your Workspace
- Line a baking sheet with parchment paper or a silicone mat to prevent the chips from sticking.
- Set up a cooling rack nearby for drying the chips after dipping.
Step 2: Melt the Chocolate
- Chop your chocolate into small, even pieces for smooth melting.
- Use one of these methods to melt it:
- Double Boiler Method: Place a heatproof bowl over a pot of simmering water (make sure the bowl doesn’t touch the water). Stir the chocolate until it’s fully melted and glossy.
- Microwave Method: Heat the chocolate in 20-second intervals, stirring between each, until smooth and lump-free.
Pro Tip: Avoid overheating the chocolate, as it can seize and become grainy. If this happens, add a teaspoon of coconut oil or vegetable oil to restore its smooth texture.
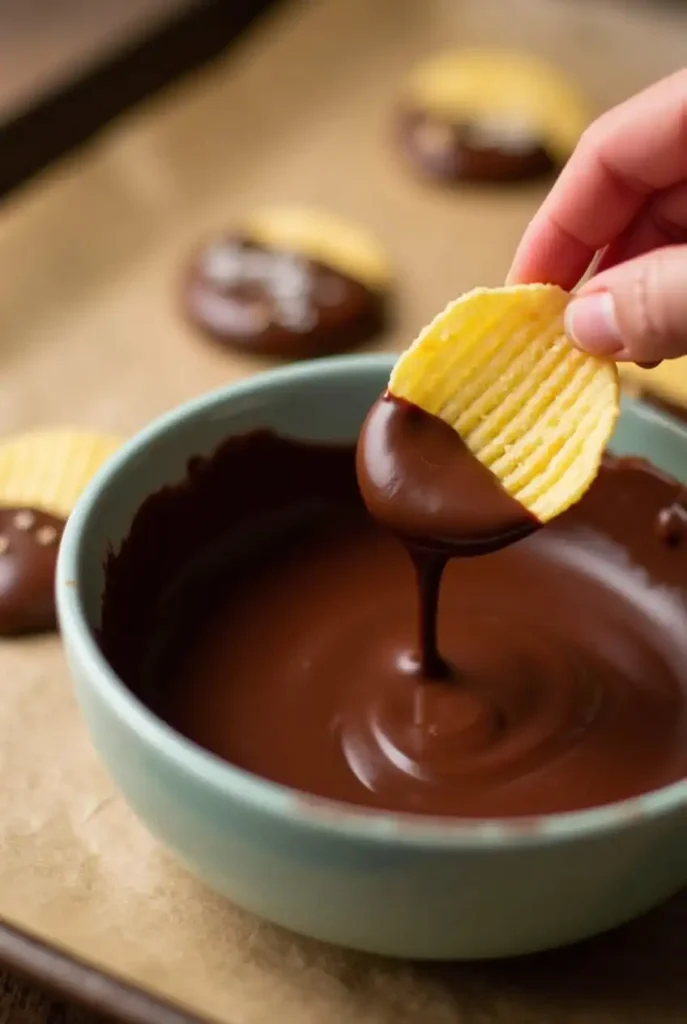
Step 3: Dip the Chips
- Hold a chip by one end and dip it halfway into the melted chocolate, swirling gently to coat evenly.
- Let the excess chocolate drip off, then place the chip on the prepared baking sheet.
Step 4: Add Toppings (Optional)
- While the chocolate is still wet, sprinkle on your favorite toppings like crushed nuts, sprinkles, or a pinch of sea salt for an extra flavor boost.
Step 5: Let Them Set
- Allow the chips to cool at room temperature for about 20-30 minutes. For faster results, pop them in the fridge for 10-15 minutes.
Pro Tip: Work in small batches to keep the chocolate warm and easy to work with. If it thickens, gently reheat it.
And there you have it—chocolate covered chips that are crispy, creamy, and utterly irresistible! Ready to explore some creative twists on this recipe? Let’s dive into the next section for pro tips and variations!
Pro Tips and Variations
Now that you’ve mastered the basics of making chocolate covered chips, let’s take your snack game to the next level with some pro tips and creative variations. Whether you’re looking to experiment with flavors or troubleshoot common issues, these insights will help you perfect your recipe and make it uniquely yours.
Pro Tips for Success
- Choose Sturdy Chips: Go for thick, ridged chips like kettle-cooked varieties. They’re sturdier and hold up better during dipping, giving you the perfect crunch.
- Temper Your Chocolate: For a glossy finish and a satisfying snap, melt two-thirds of your chocolate first, then stir in the remaining third until smooth.
- Work in Small Batches: Melt chocolate in smaller amounts to keep it warm and easy to work with. If it thickens, gently reheat it.
- Use a Fork for Dipping: If you’re having trouble coating the chips evenly, use a fork to dip them and gently tap off any excess chocolate.
- Store Properly: Keep your finished chips in an airtight container at room temperature for up to 3 days. Avoid the fridge, as moisture can make the chips lose their crunch.
Creative Variations
- Flavor Twists:
- Swap regular potato chips for flavored varieties like barbecue, sour cream and onion, or salt and vinegar for a unique twist.
- Use white chocolate or dark chocolate instead of milk chocolate for a different flavor profile.
- Toppings Galore:
- Drizzle with caramel sauce, peanut butter, or even melted white chocolate for an extra touch of indulgence.
- Sprinkle with crushed pretzels, toasted coconut flakes, or mini marshmallows for added texture and fun.
- Dietary Adjustments:
- Use vegan chocolate and gluten-free chips to accommodate dietary restrictions.
- Swap potato chips for banana chips or sweet potato chips for a healthier twist.
- Presentation Ideas:
- Wrap them in colorful cellophane or place them in small gift boxes for a thoughtful homemade treat.
- Arrange them on a platter alongside other sweet-and-salty snacks for a stunning dessert display.
Troubleshooting Tips
- Chocolate Too Thick? Mix in a small amount of coconut oil or vegetable oil to achieve a smoother consistency.
- Chocolate Seized? Add a splash of warm milk or cream and stir gently to bring it back to a smooth texture.
- Chips Breaking? Handle them carefully and use a fork or dipping tool to maintain control while coating.
With these tips and variations, you can customize your chocolate covered chips to suit any occasion or craving. Ready to serve them up in style? Let’s move on to the next section for serving suggestions!
Serving Suggestions
Now that your chocolate covered chips are ready, it’s time to serve them up in style! Whether you’re hosting a party, enjoying a cozy night in, or gifting them to someone special, these serving ideas will make your sweet-and-salty creation shine.
1. Party Platter Perfection
- Arrange your chocolate covered chips on a large platter alongside other snacks like pretzels, popcorn, and fresh fruit for a stunning sweet-and-salty spread.
- Add small bowls of dipping sauces like caramel, peanut butter, or melted chocolate for an interactive dessert experience.
2. Dessert Table Delight
- Create a dedicated dessert table featuring your chips in decorative jars or tiered stands. Pair them with cookies, brownies, and mini cupcakes for a full dessert lineup.
- Use themed decorations like fairy lights, colorful napkins, or seasonal accents to make the display pop.
3. Gift-Worthy Goodies
- Package your chips in clear cellophane bags tied with ribbon or place them in small gift boxes for a thoughtful homemade present.
- Add a personalized tag or label with fun phrases like “Sweet & Salty Bliss” or “Chocolate Chip Heaven” to make it extra special.
4. Pairing Ideas
- Serve your chocolate covered chips with a cup of hot coffee, tea, or cocoa for a cozy treat.
- Pair them with a scoop of vanilla ice cream or a drizzle of chocolate sauce for an indulgent dessert.
5. Kid-Friendly Fun
- Let kids create their own dessert platters by setting out bowls of toppings like sprinkles, crushed candies, and mini marshmallows. They’ll love customizing their chips!
- Pack them in lunchboxes or after-school snack bags for a sweet surprise.
6. Seasonal Twists
- For holidays, use themed toppings like red and green sprinkles for Christmas or pastel colors for Easter.
- Add a festive touch by packaging them in holiday-themed containers or wrapping.
With these serving suggestions, your chocolate covered chips will be the star of any occasion. Ready to wrap things up? Let’s head to the conclusion for some final thoughts!
Conclusion
There you have it—your ultimate guide to making chocolate covered chips! This simple yet irresistible treat is proof that the best snacks often come from the most unexpected combinations. Whether you’re craving a sweet-and-salty bite, impressing guests at a party, or gifting a homemade delight, this recipe is a winner every time.
Why You’ll Love This Recipe
- Quick and Easy: With just a few ingredients and minimal prep time, you can whip up a batch in no time.
- Endlessly Customizable: From the type of chocolate to the toppings, you can make it your own.
- Perfect for Any Occasion: Whether it’s a casual snack, a party centerpiece, or a heartfelt gift, these chips fit the bill.
Final Thoughts
Making chocolate covered chips is more than just a recipe—it’s an experience. It’s about experimenting with flavors, sharing with loved ones, and enjoying the simple joy of creating something delicious. So, grab your ingredients, get creative, and let your taste buds lead the way.
Your Turn!
Have fun with this recipe and make it your own. Try new flavor combinations, share your creations with friends, and don’t forget to tag us if you post your masterpiece online. We’d love to see how you enjoy this sweet-and-salty treat!
Ready to answer some common questions? Let’s dive into the FAQs to clear up any doubts and inspire even more creativity!

Chocolate Covered Chips Recipe Recap
Ingredients
- Potato Chips: 4 cups of sturdy ridged chips (like kettle-cooked) for the perfect crunch.
- Chocolate: 12 oz of high-quality chocolate—choose dark chocolate for a rich flavor milk chocolate for a sweeter taste, or white chocolate for a creamy twist.
Toppings (Optional):
- Crushed nuts almonds, peanuts, or pecans
- Sprinkles or colored sugar
- Sea salt flakes for an extra salty kick
- Caramel or peanut butter drizzle
Instructions
Step 1: Prep Your Workspace
- Line a baking sheet with parchment paper or a silicone mat to prevent the chips from sticking.
- Set up a cooling rack nearby for drying the chips after dipping.
Step 2: Melt the Chocolate
- Chop your chocolate into small, even pieces for smooth melting.
- Use one of these methods to melt it:
- Double Boiler Method: Place a heatproof bowl over a pot of simmering water (make sure the bowl doesn’t touch the water). Stir the chocolate until it’s fully melted and glossy.
- Microwave Method: Heat the chocolate in 20-second intervals, stirring between each, until smooth and lump-free.
- Pro Tip: Avoid overheating the chocolate, as it can seize and become grainy. If this happens, add a teaspoon of coconut oil or vegetable oil to restore its smooth texture.
Step 3: Dip the Chips
- Hold a chip by one end and dip it halfway into the melted chocolate, swirling gently to coat evenly.
- Let the excess chocolate drip off, then place the chip on the prepared baking sheet.
Step 4: Add Toppings (Optional)
- While the chocolate is still wet, sprinkle on your favorite toppings like crushed nuts, sprinkles, or a pinch of sea salt for an extra flavor boost.
Step 5: Let Them Set
- Allow the chips to cool at room temperature for about 20-30 minutes. For faster results, pop them in the fridge for 10-15 minutes.
Video
Notes
- Prep Time: 10 minutes
- Cook Time: 5 minutes
- Total Time: 15 minutes
- Servings: 4 cups
- Calories: ~150 per serving (1/2 cup)
FAQs
Got questions about making chocolate covered chips? Don’t worry—I’ve got you covered! Here are answers to some of the most common questions to help you perfect this sweet-and-salty treat.
1. Can I use any type of chocolate?
Absolutely! You can use dark chocolate, milk chocolate, or white chocolate—whatever suits your taste. Opt for high-quality chocolate to ensure a smooth, rich flavor. For a vegan option, choose dairy-free chocolate.
2. What’s the best way to melt chocolate?
You can melt chocolate using a double boiler for even heat or the microwave for convenience. If using a microwave, heat in 20-second intervals and stir between each to avoid burning.
3. How do I stop the chocolate from becoming grainy?
Chocolate can seize if it comes into contact with water or is overheated. To prevent this, ensure your tools are completely dry and melt the chocolate gently. If it does seize, stir in a teaspoon of coconut oil or warm milk to restore its smooth texture.
4. Can I make these ahead of time?
Yes! Store your chocolate covered chips in an airtight container at room temperature for up to 3 days. Avoid refrigeration, as moisture can make the chips lose their crunch.
5. Are there gluten-free or vegan options?
Definitely! Use gluten-free potato chips and vegan chocolate to accommodate dietary restrictions. You can also swap potato chips for banana chips or sweet potato chips for a healthier twist.
6. What toppings work best?
The possibilities are endless! Try crushed nuts, sprinkles, sea salt flakes, or a drizzle of caramel or peanut butter. Get creative and mix and match to find your favorite combo.
7. Can I gift these?
Absolutely! Package them in clear cellophane bags or small gift boxes, and tie them with ribbon for a thoughtful homemade present. Include a handwritten note or custom label to make it extra special.
8. What if my chips break while dipping?
Handle the chips gently and use a fork or dipping tool for better control. If they still break, don’t worry—they’ll taste just as delicious!
With these FAQs, you’re all set to create the perfect batch of chocolate covered chips. Now, go ahead and enjoy every sweet, salty, and crunchy bite!
2 thoughts on “Chocolate Covered Chips”