

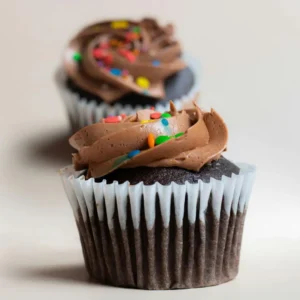
Who says you need dairy to enjoy rich, indulgent dairy free chocolate cupcakes? These cupcakes deliver all the moist, fluffy texture and deep chocolate flavor you love—without a drop of milk or butter. Whether you’re vegan, lactose-intolerant, or simply craving a lighter dessert, this recipe is a must-try.
Made with simple, plant-based ingredients like almond milk and coconut oil, these cupcakes come together effortlessly—no fancy techniques required! Plus, they’re naturally egg-free, making them perfect for those with allergies or dietary restrictions.
Ready to bake a batch of dairy free chocolate cupcakes that are as easy as they are delicious? Let’s get started!
Table of Contents
Key Benefits of Dairy Free Chocolate Cupcakes
If you think going dairy-free means sacrificing flavor or texture, these dairy free chocolate cupcakes will change your mind! They’re not only rich, moist, and fluffy, but they also offer several benefits that make them a must-try treat.
Why You’ll Love This Recipe
✔ Completely Dairy-Free – Perfect for those with lactose intolerance or anyone avoiding dairy.
✔ Naturally Egg-Free – No complicated substitutes, just simple, plant-based ingredients.
✔ Rich, Chocolatey Goodness – Thanks to high-quality cocoa powder and a touch of dairy-free dark chocolate.
✔ Easy to Make – No fancy equipment required, just a bowl and a whisk!
✔ Customizable – Easily make them gluten-free, nut-free, or extra indulgent with a few tweaks.
Healthier Than Traditional Cupcakes
While these cupcakes taste indulgent, they’re made with wholesome, plant-based ingredients like almond milk and coconut oil, which provide moisture and richness without the heaviness of dairy. Plus, using natural sweeteners like maple syrup or coconut sugar can add depth of flavor while keeping them refined sugar-free.
Whether you’re baking for a party, a special occasion, or just to satisfy a chocolate craving, these dairy free chocolate cupcakes are guaranteed to impress. Let’s dive into the ingredients that make them so delicious!
Ingredients for Dairy Free Chocolate Cupcakes
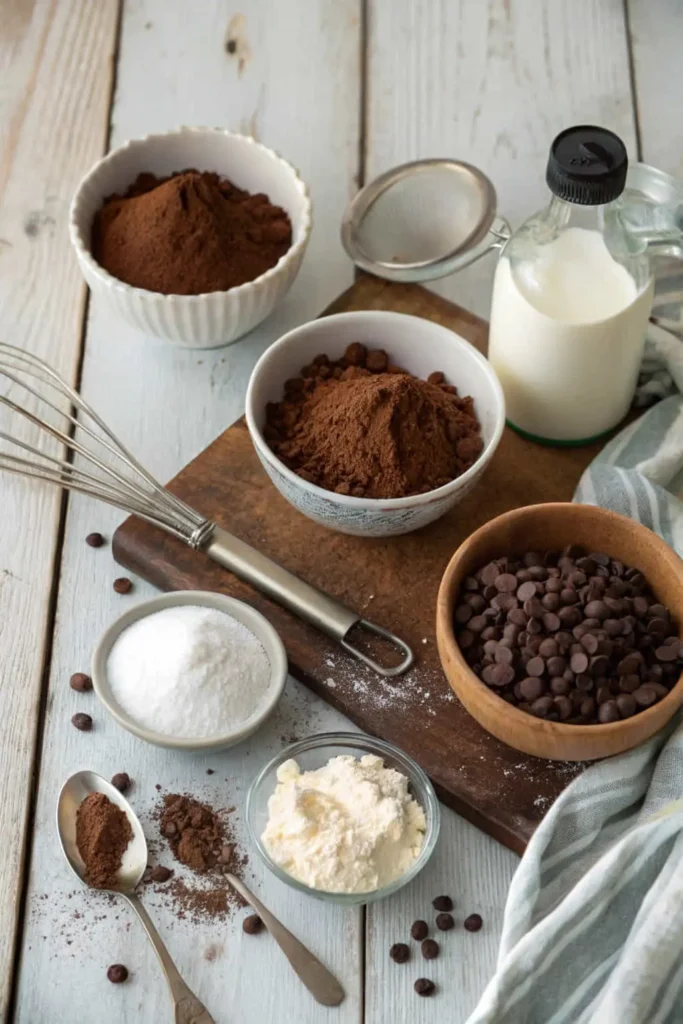
Gather your ingredients—it’s time to bake rich, moist, and fluffy dairy free chocolate cupcakes! These simple, plant-based ingredients work together to create a deep chocolate flavor without the need for dairy or eggs.
Dry Ingredients:
- 1 cup (125g) all-purpose flour – For a soft, tender crumb. Swap with gluten-free flour for a GF option.
- ½ cup (50g) unsweetened cocoa powder – Use high-quality cocoa for a richer chocolate taste.
- ¾ cup (150g) coconut sugar or organic cane sugar – Adds the perfect level of sweetness.
- 1 teaspoon baking soda – Helps the cupcakes rise beautifully.
- ¼ teaspoon salt – Enhances the overall flavor.
Wet Ingredients:
- 1 cup (240ml) unsweetened almond milk – Oat milk or soy milk also work well.
- ⅓ cup (80ml) melted coconut oil or dairy-free butter – Keeps the cupcakes moist.
- 1 tablespoon apple cider vinegar – Reacts with the baking soda to create a fluffy texture.
- 1 teaspoon pure vanilla extract – Enhances the chocolate flavor.
Optional Add-Ins:
- ½ cup (90g) dairy free dark chocolate chips – For extra indulgence.
- 1 teaspoon espresso powder – Intensifies the chocolate flavor without tasting like coffee.
Ingredient Tips:
✔ For a refined sugar-free version, use maple syrup and reduce the milk slightly.
✔ Want a nut-free option? Swap almond milk for oat or soy milk.
✔ Make them extra rich by using Dutch-process cocoa for a deeper chocolate taste.
Now that we have everything ready, let’s move on to the fun part—baking!
How to Make Dairy Free Chocolate Cupcakes

Ready to bake some dairy free chocolate cupcakes that are as delicious as they are easy? Let’s walk through the steps together. With just a few simple ingredients and a little bit of time, you’ll have a batch of rich, moist cupcakes to enjoy!
Step 1: Preheat and Prepare
Set your oven to 350°F (175°C), and prepare your muffin tin by lining it with cupcake liners. This makes the cupcakes easy to remove after baking and prevents sticking. You can also lightly grease the liners with a bit of coconut oil for an extra non-stick layer if desired.
Step 2: Mix the Dry Ingredients
In a large bowl, whisk together:
- 1 cup all-purpose flour
- ½ cup unsweetened cocoa powder
- ¾ cup coconut sugar
- 1 teaspoon baking soda
- ¼ teaspoon salt
Whisk until all the dry ingredients are fully combined. This will help prevent any lumps when you add the wet ingredients.
Step 3: Combine the Wet Ingredients
In a separate bowl, whisk together:
- 1 cup almond milk (or any non-dairy milk of your choice)
- ⅓ cup melted coconut oil (or dairy-free butter)
- 1 tablespoon apple cider vinegar
- 1 teaspoon vanilla extract
Make sure everything is smooth and well blended—this helps the cupcakes stay light and fluffy once baked.
Step 4: Mix Wet and Dry Ingredients
Add the wet ingredients into the dry ingredients and gently stir to combine. Try not to overmix—the batter can remain a little lumpy, and that’s perfectly fine! Overmixing can lead to dense cupcakes, and we want them nice and light.
Step 5: Bake
Spoon the batter evenly into the muffin tin, filling each liner about ⅔ full.Bake in the preheated oven for 18-20 minutes, or until a toothpick comes out clean when inserted into the center of a cupcake.
Step 6: Cool and Enjoy
After baking, let the cupcakes sit in the muffin tin for about 5 minutes to cool slightly. Next, gently move the cupcakes onto a wire rack to allow them to cool completely. Now they’re ready to enjoy as-is or topped with your favorite frosting.
Pro Tip:
For an extra touch, sprinkle a few dairy free chocolate chips on top of the batter before baking. The melted chocolate will create a delicious chocolatey crust on the cupcakes!
Pro Tips and Variations for Dairy Free Chocolate Cupcakes
If you’re looking to take your dairy free chocolate cupcakes to the next level or customize them for different tastes and dietary needs, you’re in the right place! Here are some expert tips and fun variations to make this recipe uniquely yours.
Pro Tips for Perfect Cupcakes:
✔ Don’t Overmix the Batter – When combining the wet and dry ingredients, mix just until combined. Overmixing can result in dense cupcakes, and we want them light and fluffy.
✔ Sift the Dry Ingredients – To prevent lumps in the cocoa powder or flour, sift the dry ingredients before mixing. This step ensures a smooth batter and more even baking.
✔ Check the Oven Temperature – Ovens can vary in temperature. Use an oven thermometer to ensure your cupcakes bake at the right temperature, ensuring the perfect rise and texture.
✔ Let the Cupcakes Cool Completely – This is essential for the best texture, especially if you’re frosting the cupcakes. Frosting warm cupcakes can cause it to melt or become too runny.
Fun Variations to Try:
- Gluten-Free Option:
Swap the all-purpose flour with a 1:1 gluten-free flour blend to make these cupcakes completely gluten-free. Ensure that the flour blend includes xanthan gum or add it separately to help with the texture. - Add a Little Spice:
Add ½ teaspoon cinnamon or ¼ teaspoon chili powder to the dry ingredients for a unique twist. It pairs beautifully with the rich chocolate flavor and gives your cupcakes a subtle warmth. - Dairy-Free Chocolate Frosting:
Top your cupcakes with a rich and creamy dairy-free chocolate frosting. Combine dairy-free butter or coconut oil, cocoa powder, powdered sugar, and a splash of non-dairy milk for a velvety smooth frosting that complements the chocolatey cupcakes perfectly. - Add-ins for Extra Texture:
For added crunch, fold in some chopped nuts (like walnuts or pecans), or toss in a handful of dairy-free chocolate chips. They’ll melt into the batter and create pockets of gooey chocolate throughout! - Fillings or Toppings:
Try adding a dollop of raspberry jam or a piece of dairy-free caramel inside the cupcakes before baking for a surprise filling. You can also sprinkle the top with a touch of sea salt after frosting for a sweet-salty contrast.
Helpful Tip for Storing:
Store leftover cupcakes in an airtight container at room temperature for up to 3 days. If you want to keep them fresh longer, freeze them! Just wrap each cupcake tightly in plastic wrap and store in a freezer-safe bag for up to 2 months. Thaw at room temperature when ready to enjoy.
With these pro tips and variations, you can easily make these dairy free chocolate cupcakes your own! Whether you want to keep it classic or experiment with new flavors, these cupcakes are as versatile as they are delicious.
Serving Suggestions for Dairy Free Chocolate Cupcakes
Now that you’ve baked up a batch of these dairy free chocolate cupcakes, you might be wondering how best to serve them. Whether you’re preparing them for a special occasion or enjoying them as an everyday treat, here are some delicious and creative ways to serve your cupcakes that will impress everyone!
1. Top with Dairy-Free Frosting
The simplest way to elevate your cupcakes is by adding a dairy-free chocolate frosting or vegan buttercream. These creamy, smooth frostings complement the rich chocolate flavor and make your cupcakes look even more enticing. For extra decoration, sprinkle some dairy-free chocolate chips or shredded coconut on top.
2. Add Fresh Fruit
If you want a fresh contrast to the sweetness, top your cupcakes with some fresh berries like raspberries, strawberries, or blueberries. The tartness of the fruit pairs beautifully with the chocolate and gives a pop of color to your dessert. You can also add thinly sliced bananas for a fun flavor combination.
3. Make a Cupcake Sundae
For a more indulgent treat, transform your cupcakes into a mini sundae! Place a cupcake in a bowl, top it with dairy-free vanilla ice cream, and drizzle with dairy-free chocolate syrup. For extra flair, add a cherry on top (or even some crushed nuts for crunch). This is perfect for a party or a special dessert night.
4. Serve as a Party Treat
These cupcakes are perfect for parties or celebrations, whether it’s a birthday, holiday, or casual gathering. If you’re serving them at a party, consider displaying them on a decorative cupcake stand or creating a cupcake tower. This will create an impressive centerpiece and give your guests easy access to the sweet treats.
5. Pair with a Warm Beverage
For a cozy touch, serve your cupcakes alongside a cup of hot chocolate, coffee, or dairy-free chai latte. The warm beverages balance out the sweetness of the cupcakes and make for the perfect pairing, whether for an afternoon treat or a special dessert after dinner.
6. Enjoy with a Dairy-Free Whipped Cream
For a lighter touch, add a dollop of dairy-free whipped cream to each cupcake. You can make your own using coconut cream or use store-bought options. It’s an easy way to add a little extra creamy goodness without being too heavy.
Fun Twist:
If you’re feeling creative, try filling the cupcakes with a dairy-free caramel or fruit jam before baking for a fun surprise inside! You can also dust them lightly with powdered sugar or top them with a dairy-free chocolate ganache for a fancy, elegant finish.
With these serving suggestions, your dairy free chocolate cupcakes will go from delicious to extraordinary, whether you’re serving them for an occasion or just treating yourself to a sweet moment.
Conclusion: Why You’ll Love These Dairy Free Chocolate Cupcakes
There you have it—your ultimate guide to baking dairy free chocolate cupcakes that are just as rich, moist, and delicious as their dairy-filled counterparts. Whether you’re baking for a special occasion or treating yourself to a sweet snack, these cupcakes are sure to impress. Here’s why you’ll love making this recipe again and again:
1. Easy to Make
This recipe is simple and straightforward, even if you’re new to baking or dairy-free cooking. With a handful of basic ingredients, you can create bakery-quality cupcakes in no time. Plus, there’s no need for fancy equipment—just a few mixing bowls, a muffin tin, and an oven.
2. Perfectly Balanced Flavor
These dairy free chocolate cupcakes strike the ideal balance between rich chocolate flavor and a light, airy texture. The cocoa powder creates that deep chocolate taste, while the non-dairy milk keeps everything soft and moist. It’s the perfect indulgence, minus the dairy.
3. Versatile and Customizable
Whether you prefer frosting, fruit toppings, or a bit of crunch, this recipe can be tailored to fit your taste. The flexibility of this recipe makes it easy to experiment with different variations, making each batch uniquely yours.
4. Perfect for Everyone
Whether you’re dairy-free by choice or necessity, these cupcakes are the perfect treat for anyone with dietary restrictions. But even those who aren’t following a dairy-free lifestyle will love how delicious these cupcakes taste!
5. A Crowd-Pleaser
These cupcakes are guaranteed to impress at any gathering, from birthday parties to casual get-togethers. They’re so good that no one will believe they’re dairy-free! Share them with friends and family, and watch everyone go back for seconds.
These dairy free chocolate cupcakes are more than just a dessert—they’re a delicious way to indulge without compromise. With their perfect texture, rich chocolate flavor, and endless customization options, they’re sure to become a regular part of your baking repertoire.
So, what are you waiting for? Grab your ingredients, preheat that oven, and treat yourself to a batch of these delightful cupcakes today!
Dairy Free Chocolate Cupcakes
Ingredients
Dry Ingredients:
- 1 cup 125g all-purpose flour – For a soft, tender crumb. Swap with gluten-free flour for a GF option.
- ½ cup 50g unsweetened cocoa powder – Use high-quality cocoa for a richer chocolate taste.
- ¾ cup 150g coconut sugar or organic cane sugar – Adds the perfect level of sweetness.
- 1 teaspoon baking soda – Helps the cupcakes rise beautifully.
- ¼ teaspoon salt – Enhances the overall flavor.
Wet Ingredients:
- 1 cup 240ml unsweetened almond milk – Oat milk or soy milk also work well.
- ⅓ cup 80ml melted coconut oil or dairy-free butter – Keeps the cupcakes moist.
- 1 tablespoon apple cider vinegar – Reacts with the baking soda to create a fluffy texture.
- 1 teaspoon pure vanilla extract – Enhances the chocolate flavor.
Optional Add-Ins:
- ½ cup 90g dairy free dark chocolate chips – For extra indulgence.
- 1 teaspoon espresso powder – Intensifies the chocolate flavor without tasting like coffee.
Instructions
Step 1: Preheat and Prepare
- Set your oven to 350°F (175°C), and prepare your muffin tin by lining it with cupcake liners. This makes the cupcakes easy to remove after baking and prevents sticking. You can also lightly grease the liners with a bit of coconut oil for an extra non-stick layer if desired.
Step 2: Mix the Dry Ingredients
- In a large bowl, whisk together:
- 1 cup all-purpose flour
- ½ cup unsweetened cocoa powder
- ¾ cup coconut sugar
- 1 teaspoon baking soda
- ¼ teaspoon salt
- Whisk until all the dry ingredients are fully combined. This will help prevent any lumps when you add the wet ingredients.
Step 3: Combine the Wet Ingredients
- In a separate bowl, whisk together:
- 1 cup almond milk (or any non-dairy milk of your choice)
- ⅓ cup melted coconut oil (or dairy-free butter)
- 1 tablespoon apple cider vinegar
- 1 teaspoon vanilla extract
- Make sure everything is smooth and well blended—this helps the cupcakes stay light and fluffy once baked.
Step 4: Mix Wet and Dry Ingredients
- Add the wet ingredients into the dry ingredients and gently stir to combine. Try not to overmix—the batter can remain a little lumpy, and that’s perfectly fine! Overmixing can lead to dense cupcakes, and we want them nice and light.
Step 5: Bake
- Spoon the batter evenly into the muffin tin, filling each liner about ⅔ full.Bake in the preheated oven for 18-20 minutes, or until a toothpick comes out clean when inserted into the center of a cupcake.
Step 6: Cool and Enjoy
- After baking, let the cupcakes sit in the muffin tin for about 5 minutes to cool slightly. Next, gently move the cupcakes onto a wire rack to allow them to cool completely. Now they’re ready to enjoy as-is or topped with your favorite frosting.
Video
Notes
- Prep Time: 15 minutes
- Cook Time: 18-20 minutes
- Total Time: 35 minutes
- Servings: 12 cupcakes
- Calories: ~180 kcal per cupcake
FAQs About Dairy Free Chocolate Cupcakes
Here are some common questions you might have when making these dairy free chocolate cupcakes. Whether you’re a first-time baker or an experienced one, these answers should help guide you to cupcake perfection.
1. Can I substitute the non-dairy milk in dairy free chocolate cupcakes?
Yes, you can use any non-dairy milk that fits your preference! Almond milk, coconut milk, or oat milk all work beautifully in this recipe. Each type will offer a slightly different flavor, but all will give you moist and delicious dairy free chocolate cupcakes.
2. What’s the best frosting for dairy free chocolate cupcakes?
A great option is dairy free chocolate frosting made with coconut oil or dairy-free butter. You can also try a rich vegan buttercream. It’s creamy, sweet, and perfect for pairing with the chocolate cupcakes.
3. Can I make these cupcakes gluten-free?
Absolutely! To make these dairy free chocolate cupcakes gluten-free, swap the all-purpose flour for a gluten-free flour blend. Just be sure your flour blend contains xanthan gum to ensure the right texture.
4. How long do dairy free chocolate cupcakes stay fresh?
These dairy free chocolate cupcakes are best enjoyed within 3 days if stored in an airtight container at room temperature. For longer storage, wrap each cupcake individually and place them in a freezer-safe bag to preserve freshness. When you’re ready to enjoy them, simply let them thaw at room temperature for a few hours.
5. Is it possible to prepare these cupcakes in advance?
Absolutely! You can bake the dairy free chocolate cupcakes the day before and store them in an airtight container at room temperature. Frost them just before serving to keep the frosting fresh and the cupcakes at their best.
6. Can I add other flavors to these dairy free chocolate cupcakes?
Definitely! You can add ingredients like cinnamon, vanilla extract, or even a few drops of orange extract to create unique variations of your dairy free chocolate cupcakes.
7. How can I make dairy free chocolate cupcakes more decadent?
To make your cupcakes extra indulgent, you can fold in dairy free chocolate chips into the batter. For a real treat, top with dairy free chocolate ganache or a sprinkle of coconut flakes.
8. Can I use a different sweetener for dairy free chocolate cupcakes?
Yes! If you prefer a different sweetener, you can swap coconut sugar with maple syrup, agave, or even stevia. Just be mindful of the consistency and adjust the liquid ratio if necessary.
9. Why did my dairy free chocolate cupcakes turn out dense?
Dense cupcakes are often a result of overmixing the batter or overbaking. Be sure to mix just until combined and check your cupcakes around 18 minutes of baking time.
10. Can I make mini versions of these dairy free chocolate cupcakes?
Of course! You can easily make mini dairy free chocolate cupcakes by adjusting the baking time. They typically bake faster, so keep an eye on them after 12 minutes to ensure they don’t overcook.
These frequently asked questions should help you navigate any challenges and make your dairy free chocolate cupcakes a huge hit every time! Let me know if you have any more questions or need additional tips!
Craving more dairy-free chocolate delights? Discover our mouth-watering Banana Brownies—a simple, three-ingredient recipe that’s both healthy and indulgent!
1 thought on “Dairy Free Chocolate Cupcakes”