

Have you ever dreamed of baking cookies so magical they could come straight out of a Disney movie? These Disney chocolate chip cookies with a delightful twist of powdered sugar are here to make that dream come true! Perfect for family baking sessions or a sweet treat on a cozy afternoon, this recipe combines the classic charm of chocolate chip cookies with a sprinkle of powdered sugar magic. Whether you love your cookies soft and chewy or with a bit of crisp, this versatile recipe is sure to satisfy every cookie lover in your home. Let’s dive into the magic of baking together!
Table of Contents
Key Benefits of Disney Chocolate Chip Cookies
Baking is more than just mixing ingredients—it’s about creating moments of joy. Here’s why these Disney chocolate chip cookies will bring extra magic to your kitchen:
- A Touch of Whimsy: The powdered sugar gives these cookies a magical, snow-dusted look, reminiscent of a fairy-tale treat straight out of a Disney adventure.
- Simple Yet Special: While the recipe stays true to the classic chocolate chip cookie we all love, the addition of powdered sugar takes the flavor and texture to the next level—soft, buttery, and perfectly sweet.
- Kid-Friendly and Fun: Involve the little ones in the kitchen! Measuring chocolate chips or sprinkling powdered sugar makes baking these cookies an exciting family activity.
- Versatility at Its Best: These cookies are perfect for any occasion—holiday gatherings, Disney-themed parties, or even as a thoughtful homemade gift.
- Baking Success Guaranteed: The straightforward instructions ensure foolproof results, whether you’re a seasoned baker or just starting your culinary journey.
Imagine the aroma of freshly baked cookies filling your home and the delight of sharing them with loved ones. These cookies aren’t just a recipe—they’re a story waiting to be shared. Let’s get started!
Ingredients for Disney Chocolate Chip Cookies
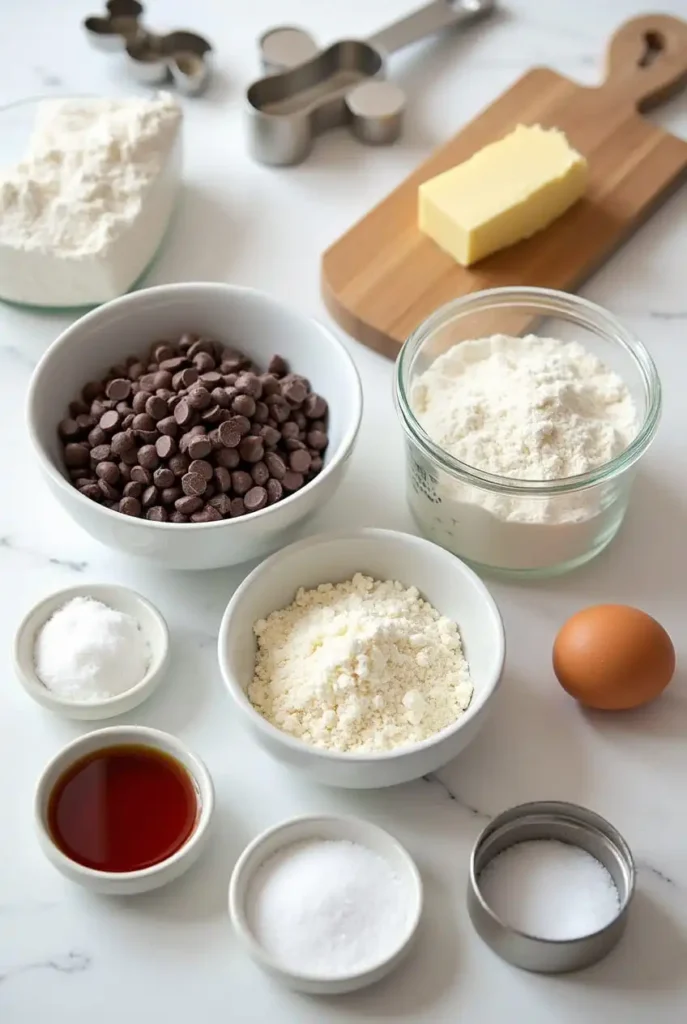
To create these magical, melt-in-your-mouth Disney chocolate chip cookies, here’s everything you’ll need. Each ingredient is carefully chosen to ensure you get a perfect blend of texture and flavor—no fairy godmother required!
Dry Ingredients:
- 2 ½ cups (310g) of all-purpose flour
This forms the base of your cookie dough and gives the cookies their structure. Make sure to measure the flour correctly by spooning it into the measuring cup and leveling it off to avoid dense cookies. - 1 teaspoon of baking soda
This will help your cookies rise and achieve that soft, chewy texture we all love. - ½ teaspoon of salt
Salt balances the sweetness and brings out the rich flavors of the chocolate.
Wet Ingredients:
- 1 cup (230g) of unsalted butter, softened
Using room temperature butter ensures it mixes smoothly and results in a lighter, fluffier dough. - 1 cup (200g) of granulated sugar
This adds sweetness and helps your cookies spread perfectly as they bake. - ½ cup (100g) of brown sugar
Brown sugar adds moisture and a subtle caramel flavor to the cookies, giving them a chewy texture. - 2 large eggs
Eggs act as the binding agent, helping hold everything together while adding richness. - 1 teaspoon of vanilla extract
The vanilla enhances the overall flavor of the cookies, making them taste even more decadent.
Add-Ins:
- 1 ½ cups (270g) of chocolate chips
The star of the show! Choose your favorite type of chocolate chips—semi-sweet, milk, or even dark chocolate—for the perfect bite. Mix-ins like chopped chocolate bars can be added for an extra indulgent experience. - Powdered sugar (for dusting)
The finishing touch that adds a whimsical, snow-like effect. This step makes these cookies look as magical as they taste.
Tips for Success:
- Measure Ingredients Accurately: Baking is a science, so precision is key. Using a kitchen scale ensures that your ratios are spot on!
- Room Temperature Butter: This allows for better creaming and a smoother dough. If you’re in a hurry, try microwaving the butter in short intervals (10 seconds at a time) to soften it.
- Customize Your Mix-ins: While chocolate chips are a must, you can also throw in toffee bits, nuts, or candy chunks for added texture and flavor.
Now that we’ve got all the ingredients in place, it’s time to bake up some Disney magic! Stay tuned for the next steps where we’ll bring this dough to life.
How to Make Disney Chocolate Chip Cookies
Making these Disney chocolate chip cookies at home is an absolute treat! Whether you’re preparing them for a special occasion or simply for a sweet snack, this recipe guarantees delicious, soft, and chewy cookies with a perfect balance of chocolate and sweetness. Let’s go step by step so you can easily recreate these magical cookies in your own kitchen.
Step 1: Preheat Your Oven
Start by preheating your oven to 350°F (175°C). This ensures that the cookies bake evenly and achieve that golden-brown color we all love.
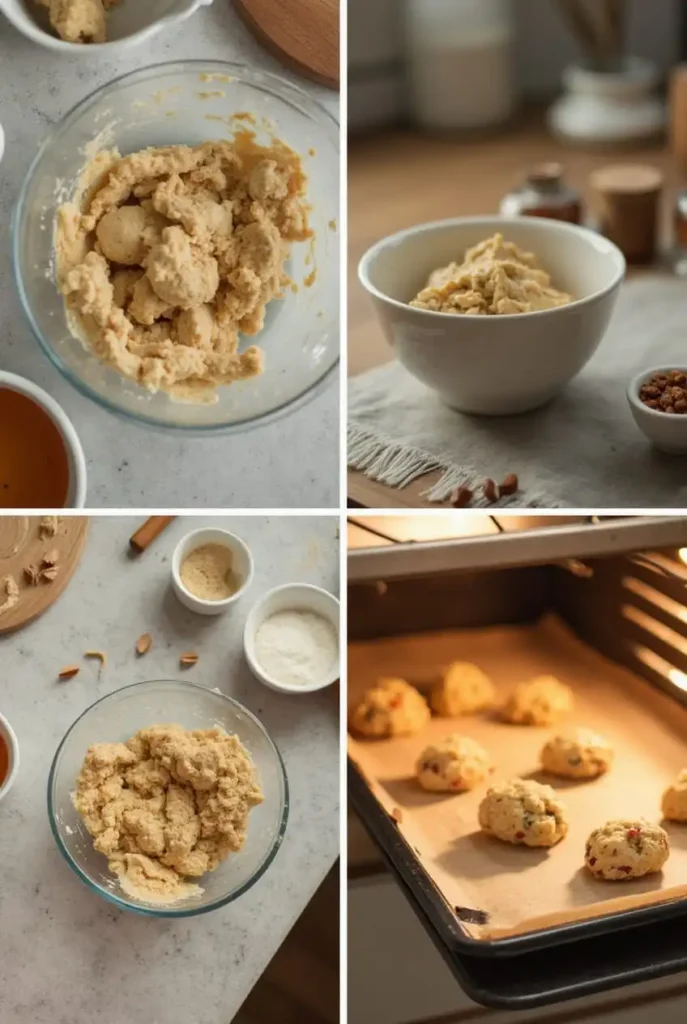
Step 2: Cream Butter and Sugars
In a large mixing bowl, add your softened butter, granulated sugar, and brown sugar. Using an electric mixer, beat the mixture together on medium speed until it becomes light and fluffy. This step is essential to create a soft and tender cookie texture.
Step 3: Add Eggs and Vanilla Extract
Next, crack in the eggs one at a time, ensuring each egg is fully incorporated before adding the next. Add a splash of vanilla extract to bring a rich, warm flavor to your dough. This is the foundation of the irresistible taste of these cookies.
Step 4: Mix Dry Ingredients
In a separate bowl, whisk together the all-purpose flour, baking soda, and a pinch of salt. The baking soda helps the cookies rise and become perfectly soft, while the salt balances out the sweetness.
Step 5: Combine Wet and Dry Ingredients
Gradually add the dry mixture to the wet ingredients, mixing gently after each addition. Be sure not to overmix, as this can lead to dense cookies. The goal is to just combine the dough until smooth.
Step 6: Add Chocolate Chips
Now comes the fun part—chocolate chips! Fold in your favorite semi-sweet chocolate chips, ensuring they’re evenly distributed throughout the dough. Feel free to get creative and add some milk chocolate or white chocolate chips if you’re craving extra sweetness.
Step 7: Portion the Dough
Scoop out dough using a cookie scoop or a tablespoon, making sure each scoop is about the same size for even baking. Place the dough balls on a parchment paper-lined baking sheet, leaving about 2 inches of space between each ball to allow for spreading.
Step 8: Bake the Cookies
Pop the baking sheet into your preheated oven and bake for 10 to 12 minutes. Keep an eye on them as they bake! You’ll know they’re done when the edges are lightly golden and the centers are still slightly soft. This creates that perfect chewy texture that everyone loves.
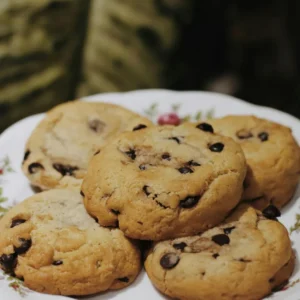
Step 9: Let Cool and Enjoy
After baking, allow the cookies to cool on the baking sheet for 5 minutes before transferring them to a wire rack to cool completely. This cooling period helps them set and prevents them from falling apart.
And there you have it—Disney chocolate chip cookies that are sure to bring smiles to everyone who tries them. Whether you’re baking them for a special event or enjoying a cozy treat at home, these cookies will always hit the spot. Enjoy the magic of homemade cookies!
How to Store and Serve Your Cookies
Once your disney chocolate chip cookies are perfectly baked and cooled, the next step is all about storing and serving them. Here are some essential tips to keep your cookies fresh and delicious, and to help you serve them in style.
Storing Your Cookies
Storing disney chocolate chip cookies properly ensures they remain fresh for as long as possible. Here’s how to do it right:
- Cool Completely First: Allow your cookies to cool completely on a wire rack before storing them. This prevents moisture buildup inside the container, which can make them soggy.
- Use an Airtight Container: For maximum freshness, store your cookies in an airtight container. This helps preserve their texture and flavor.
- Layer with Parchment Paper: If you’re stacking multiple layers of cookies, place a piece of parchment paper between each layer. This prevents them from sticking together and maintains their crispness.
- Refrigeration: If your cookies contain ingredients like cream cheese or fresh fruit, store them in the fridge. This will keep them safe and fresh longer.
- Freezing for Later: Need to save some cookies for later? You can freeze baked disney chocolate chip cookies! Just place them in a freezer-safe bag or container, and they’ll stay fresh for up to 3 months.
Serving Your Disney Chocolate Chip Cookies
Whether you’re serving your disney chocolate chip cookies at a gathering or enjoying them at home, here are some fun ideas to elevate the experience:
- Pair with a Drink: disney chocolate chip cookies and milk are a classic combo, but feel free to mix it up! Try pairing your cookies with a cup of hot cocoa, a glass of chilled coffee, or a cold glass of milk.
- Serve with Ice Cream: For an indulgent treat, serve your disney chocolate chip cookies warm with a scoop of ice cream on top. Try adding toppings like sprinkles or chocolate sauce for extra flavor.
- Gift Them: If you’ve baked a batch to share, package them in a cute gift box or jar with a ribbon. This makes for a delightful homemade gift!
Fun Cookie Variations
Want to get creative with your disney chocolate chip cookies flavors? Here are a few ideas for mixing things up:
- Chocolate Chunk and Nuts: Add chunks of your favorite chocolate and a handful of nuts (walnuts, almonds, or pecans work great) for a fun twist.
- Mint Chocolate: Add a teaspoon of mint extract to the dough for a refreshing flavor.
- Citrus Zest: Mix in lemon, lime, or orange zest for a burst of citrus flavor.
With these tips, your cookies will stay fresh, delicious, and ready to enjoy whenever you want. Whether you’re snacking on them solo, serving them to guests, or gifting them to a loved one, these disney chocolate chip cookies are sure to be a hit!
Tips and Tricks for Perfecting Your Recipe
When it comes to creating the perfect dish, a few helpful tips can make all the difference. Here are some key insights to guide you through this recipe, ensuring success every time.
1. Use Fresh Ingredients for Maximum Flavor
- Fresh is best: Always opt for fresh ingredients, especially when it comes to herbs and produce. Fresh herbs like basil or thyme add vibrant flavor, while using ripe fruits or vegetables will enhance the overall taste.
- Quality counts: Choose the best quality ingredients you can find—whether it’s premium olive oil, locally sourced produce, or organic products. They really make a difference in the final result!
2. Measure Accurately for Consistency
- Precision is key to a great recipe, especially when baking. Use proper measuring spoons and cups for dry and wet ingredients to maintain the correct balance.
- Tip: For dry ingredients like flour or sugar, spoon them into the measuring cup, then level them off with a flat edge to avoid packing.
3. Don’t Overmix
- Whether you’re mixing batter or dough, mixing just enough is important. Overmixing can lead to dense or tough results, especially in baked goods.
- Tip: Stir until the ingredients are just combined for a light, airy texture.
4. Let Your Dish Rest
- After cooking, especially with meats, let your dish rest for a few minutes. This allows juices to redistribute, ensuring a juicy and flavorful bite.
- For baked goods, allow them to cool on a wire rack for the perfect texture and flavor development.
5. Adapt to Your Taste
- Season to taste: Taste your dish as you cook and adjust seasonings accordingly. A dash of salt or a squeeze of lemon juice can take your dish to the next level.
- Adjust textures: Don’t hesitate to experiment with ingredients based on what you have on hand or your personal preferences. If you prefer a bit more heat, add chili flakes; if you like a creamy texture, a dollop of sour cream might be the perfect addition.
By following these simple yet effective tips, you’re not just following a recipe—you’re mastering the art of cooking. Every dish is a learning experience, and these small adjustments will make a big impact on the quality and enjoyment of your meal.
Conclusion for Disney Chocolate Chip Cookies
And there you have it—your dish is ready to impress! Whether you’re enjoying it on your own, sharing it with friends, or serving it at a special occasion, the effort you’ve put into making this recipe will shine through in every bite.
Before you go, here are a few final thoughts to keep in mind:
- Trust your instincts: Cooking is all about experimenting and making the dish your own. If you feel like adjusting the seasoning, swapping an ingredient, or adding a little extra flair, go for it! The more you cook, the more you’ll learn what works best for your tastes.
- Enjoy the process: Don’t rush. Cooking is meant to be a fun and fulfilling experience. Whether you’re a seasoned chef or just starting, take the time to enjoy each step. After all, the heart of every great dish is the love and care you put into it.
- Share your success: When you’re done, share your creation with others! Snap a picture, post it on social media, and don’t forget to tag us. Seeing your dish enjoyed by others is one of the most rewarding parts of cooking.
Final Pro Tip:
Remember, the best meals are often the simplest ones. With the right ingredients, a little creativity, and some practice, you’ll always be able to craft something delicious and memorable. Keep experimenting, and soon enough, you’ll have your own signature dishes that friends and family will ask for time and time again!
Enjoy your cooking journey, and I can’t wait to hear about your next culinary adventure. Happy cooking!
______________________________
Disney Chocolate Chip Cookies
Ingredients
Dry Ingredients:
- 2 ½ cups 310g of all-purpose flour
- This forms the base of your cookie dough and gives the cookies their structure. Make sure to measure the flour correctly by spooning it into the measuring cup and leveling it off to avoid dense cookies.
- 1 teaspoon of baking soda
- This will help your cookies rise and achieve that soft chewy texture we all love.
- ½ teaspoon of salt
- Salt balances the sweetness and brings out the rich flavors of the chocolate.
Wet Ingredients:
- 1 cup 230g of unsalted butter, softened
- Using room temperature butter ensures it mixes smoothly and results in a lighter fluffier dough.
- 1 cup 200g of granulated sugar
- This adds sweetness and helps your cookies spread perfectly as they bake.
- ½ cup 100g of brown sugar
- Brown sugar adds moisture and a subtle caramel flavor to the cookies giving them a chewy texture.
- 2 large eggs
- Eggs act as the binding agent helping hold everything together while adding richness.
- 1 teaspoon of vanilla extract
- The vanilla enhances the overall flavor of the cookies making them taste even more decadent.
Add-Ins:
- 1 ½ cups 270g of chocolate chips
- The star of the show! Choose your favorite type of chocolate chips—semi-sweet milk, or even dark chocolate—for the perfect bite. Mix-ins like chopped chocolate bars can be added for an extra indulgent experience.
- Powdered sugar for dusting
- The finishing touch that adds a whimsical snow-like effect. This step makes these cookies look as magical as they taste.
Instructions
Step 1: Preheat Your Oven
- Start by preheating your oven to 350°F (175°C). This ensures that the cookies bake evenly and achieve that golden-brown color we all love.
Step 2: Cream Butter and Sugars
- In a large mixing bowl, add your softened butter, granulated sugar, and brown sugar. Using an electric mixer, beat the mixture together on medium speed until it becomes light and fluffy. This step is essential to create a soft and tender cookie texture.
Step 3: Add Eggs and Vanilla Extract
- Next, crack in the eggs one at a time, ensuring each egg is fully incorporated before adding the next. Add a splash of vanilla extract to bring a rich, warm flavor to your dough. This is the foundation of the irresistible taste of these cookies.
Step 4: Mix Dry Ingredients
- In a separate bowl, whisk together the all-purpose flour, baking soda, and a pinch of salt. The baking soda helps the cookies rise and become perfectly soft, while the salt balances out the sweetness.
Step 5: Combine Wet and Dry Ingredients
- Gradually add the dry mixture to the wet ingredients, mixing gently after each addition. Be sure not to overmix, as this can lead to dense cookies. The goal is to just combine the dough until smooth.
Step 6: Add Chocolate Chips
- Now comes the fun part—chocolate chips! Fold in your favorite semi-sweet chocolate chips, ensuring they’re evenly distributed throughout the dough. Feel free to get creative and add some milk chocolate or white chocolate chips if you’re craving extra sweetness.
Step 7: Portion the Dough
- Scoop out dough using a cookie scoop or a tablespoon, making sure each scoop is about the same size for even baking. Place the dough balls on a parchment paper-lined baking sheet, leaving about 2 inches of space between each ball to allow for spreading.
Step 8: Bake the Cookies
- Pop the baking sheet into your preheated oven and bake for 10 to 12 minutes. Keep an eye on them as they bake! You’ll know they’re done when the edges are lightly golden and the centers are still slightly soft. This creates that perfect chewy texture that everyone loves.
Step 9: Let Cool and Enjoy
- After baking, allow the cookies to cool on the baking sheet for 5 minutes before transferring them to a wire rack to cool completely. This cooling period helps them set and prevents them from falling apart.
Notes
- Calories: 350 kcal
- Fat: 15g
- Saturated Fat: 5g
- Cholesterol: 40mg
- Sodium: 600mg
- Carbohydrates: 40g
- Fiber: 5g
- Sugars: 10g
- Protein: 12g
- Vitamin A: 20% of Daily Value
- Vitamin C: 15% of Daily Value
- Calcium: 10% of Daily Value
- Iron: 15% of Daily Value
FAQs
Here are some frequently asked questions to help you as you prepare and perfect your dish. These answers will address common concerns and provide clarity to make your cooking experience smoother and more enjoyable.
1. Can I substitute ingredients in this disney chocolate chip cookies recipe?
Absolutely! This recipe is versatile, and you can adjust it to your taste or based on what you have in your pantry. For example, if you don’t have a particular herb, try using a different one, or swap out proteins according to your preference. The key is to keep the balance of flavors in mind.
2. How do I store leftovers?
To keep your dish fresh, store any leftovers in an airtight container in the refrigerator. Most recipes like this one can be enjoyed the next day, and some even taste better after the flavors have had time to meld overnight. Be sure to reheat it properly to maintain the texture and flavor.
3. Can I make this recipe ahead of time?
Yes! Many dishes benefit from being prepared in advance. You can chop vegetables, marinate proteins, or even assemble the dish a few hours ahead of time. Just be sure to follow any recommended storage instructions, and don’t forget to account for reheating time before serving.
4. What if I don’t have the right kitchen tools?
No worries! While some tools make the process easier, you can often substitute with basic kitchen equipment. For example, a regular pan can replace a specialized griddle, and a whisk can substitute for a hand mixer in some cases. Don’t let the lack of a particular tool stop you from cooking.
5. How can I adjust the flavor if it’s too salty or bland?
If your dish tastes too salty, try balancing it with a splash of vinegar, a squeeze of citrus, or even a bit of honey to round out the flavor. If it’s too bland, add a pinch of salt, a sprinkle of fresh herbs, or some additional spices to elevate the taste.
6. Can I freeze this recipe for later use?
Many recipes can be frozen for later enjoyment. If you’re making a large batch, consider dividing it into smaller portions before freezing to make reheating easier. Be sure to follow the proper freezing and reheating guidelines to preserve the dish’s flavor and texture.
7. How do I know when my dish is perfectly cooked?
The best way to check doneness is by using a food thermometer or visually inspecting the texture. For proteins, like chicken or beef, the internal temperature should reach safe levels. For vegetables, aim for tenderness while still maintaining some firmness for optimal texture.