

Craving a rich, indulgent dessert but don’t have the time to bake a full cake? This microwave lava cake is the answer! With its gooey, molten chocolate center and quick preparation, it’s perfect for those moments when you need a sweet treat in a hurry. Imagine a warm, single-serving cake made in just minutes, right in your microwave—no oven required. Whether you’re treating yourself or surprising a loved one, this dessert delivers a deliciously decadent experience with minimal effort. Ready to dive into this simple, yet irresistible treat? Let’s get started!
Table of Contents
Key Benefits of Microwave Lava Cake
Microwave lava cake isn’t just quick and easy—it’s a true game changer when it comes to satisfying your chocolate cravings in no time. Here’s why this dessert deserves a spot in your recipe rotation:
- Speed & Convenience: The best part? You can have a rich, gooey lava cake ready in minutes. No need for complicated baking processes—just pop it in the microwave, and voilà! This makes it the perfect go-to dessert for unexpected cravings or when you’re short on time.
- Single-Serving Perfection: Unlike traditional cakes that require slicing, a microwave lava cake is a personal-sized treat. It’s just the right amount of indulgence without overdoing it—ideal for solo dessert moments or when you’re entertaining guests with individual portions.
- Molten Chocolate Center: The ooey-gooey molten center is what makes lava cakes so irresistible. Every bite delivers that rich, decadent chocolate experience, with a warm, molten flow that takes it to the next level of indulgence.
- Customizable to Your Taste: Want to add a little twist? You can easily adjust this recipe to suit your flavor preferences. Add a dash of vanilla extract, a sprinkle of sea salt, or even mix in some peanut butter for an unexpected twist. Plus, it’s versatile enough to pair with your favorite dessert toppings like whipped cream or a scoop of vanilla ice cream.
- Minimal Ingredients: You don’t need a long list of ingredients to create something extraordinary. Basic pantry staples like sugar, butter, cocoa powder, and a little bit of flour come together to create the perfect molten chocolate cake.
In short, microwave lava cake brings together convenience, flavor, and a wow factor—all in one simple, easy-to-make dessert! Whether you’re treating yourself or impressing guests, this recipe will not disappoint.
Ingredients
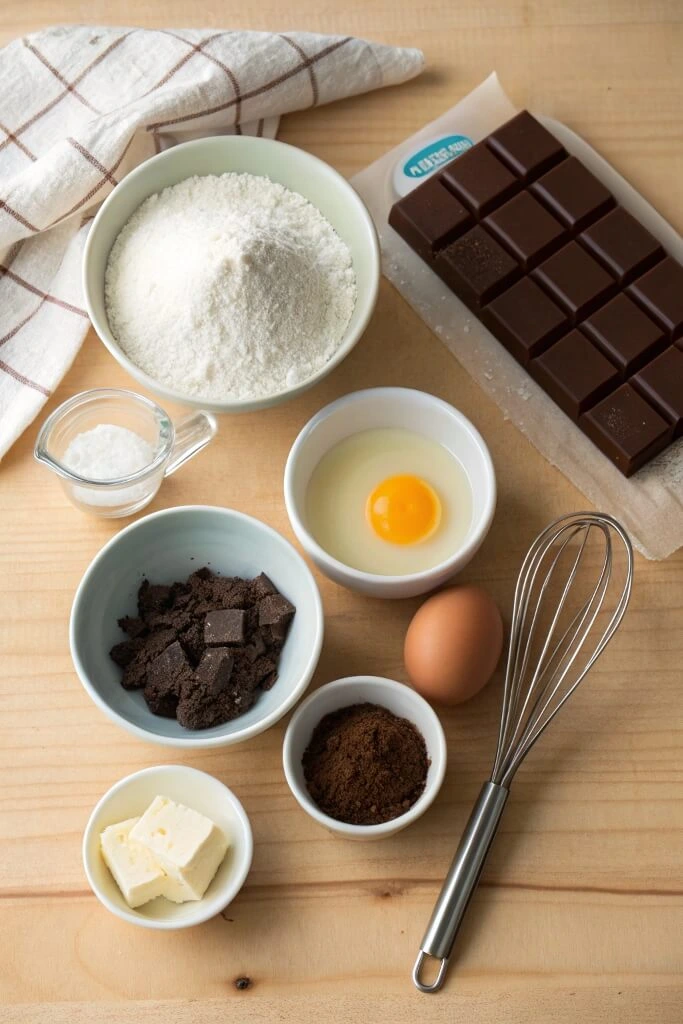
Making a microwave lava cake is easier than you think, and the ingredients are simple, but they come together to create a dessert that’s rich, indulgent, and downright irresistible. Here’s what you’ll need:
- 2 tablespoons butter (melted): Adds richness and helps create that perfect texture for the cake.
- 2 tablespoons all-purpose flour: The base of the cake, giving it structure while keeping it light.
- 2 tablespoons sugar: A touch of sweetness to balance out the richness of the chocolate.
- 1 tablespoon unsweetened cocoa powder: This is the key to that deep, chocolatey flavor you’re after.
- 1/4 teaspoon baking powder: A small amount to give the cake a light rise.
- Pinch of salt: Enhances the sweetness and flavor of the chocolate.
- 2 tablespoons milk: To make the batter smooth and moist.
- 1/4 teaspoon vanilla extract: Adds warmth and depth to the flavor.
- 1 tablespoon dark chocolate (or semi-sweet): This will form your molten lava center, creating that gooey surprise in every bite.
Optional Toppings
- Whipped cream or vanilla ice cream: These pair wonderfully with the hot, gooey cake for a balanced contrast in texture.
- Fresh berries: For a refreshing, tangy pop of flavor to balance the richness of the chocolate.
Pro Tip:
For an extra indulgent twist, you can also add a little peanut butter or caramel in the center before microwaving to make it a double surprise! This is a great way to customize the recipe to your taste.
These simple ingredients create a cake that’s decadently chocolatey with a molten center, perfect for satisfying your sweet tooth in no time. Let’s move on to putting it all together!
How to Make Microwave Lava Cake
Now that you have all your ingredients ready, it’s time to bring this microwave lava cake to life! The best part? It’s incredibly simple, and you can have a gooey, molten dessert in just a few minutes. Here’s a step-by-step guide to making the magic happen:
- Prepare Your Mug or Ramekin
Choose a microwave-safe mug or ramekin (around 6–8 ounces in size) to ensure the cake cooks evenly. Lightly grease the inside with butter or non-stick spray to prevent sticking. This is essential for that perfect molten center! - Melt the Butter
In your chosen mug or ramekin, melt the butter in the microwave for about 20-30 seconds. Keep an eye on it to avoid overheating. - Mix Dry Ingredients
Once the butter has melted, add the sugar, cocoa powder, flour, baking powder, and salt to the mug. Stir well with a spoon or a small whisk until the ingredients are fully combined. You should have a smooth, thick batter. - Add Wet Ingredients
Stir in the milk and vanilla extract to bring everything together. You’ll notice the batter becoming a bit smoother and lighter in texture, which is exactly what you want. - Create the Lava Center
Gently press a piece of dark chocolate into the center of the batter. This will melt into a gooey, molten center as the cake cooks—your lava effect! - Microwave the Cake
Microwave your lava cake on high for about 1 minute and 10 seconds, though microwave times may vary. Start checking at around 1 minute to see if the cake has risen and formed a soft, slightly wet center. You want the outer edges to be set, but the center should still look a little gooey. If it needs more time, continue to microwave in 10-second increments. - Let It Rest
Once done, let the cake sit for 1–2 minutes. This gives the lava center time to set a little and cool down enough to avoid burning your tongue when you dig in.
Pro Tip:
If you prefer a thicker lava center, try adding more chocolate to the center or slightly increasing the microwave time. Just be careful not to overcook it, or you’ll lose that glorious molten effect!
Now, you’re ready to enjoy the most indulgent, gooey, microwave lava cake—perfectly portioned and completely satisfying.
Pro Tips and Variations
Ready to take your microwave lava cake to the next level? Here are some pro tips and creative variations to make this dessert even more indulgent, fun, and customizable.
Pro Tips for Perfect Lava Cake Every Time
- Don’t Overcook It: The key to a perfect lava cake is ensuring the center stays molten. Microwaves vary, so check the cake after 1 minute. If the edges are set but the center still looks a little wet, it’s ready to enjoy. If you overcook it, you’ll lose that lava effect!
- Use Quality Chocolate: The chocolate you choose can make a big difference. Opt for dark chocolate or semi-sweet chocolate for that rich, decadent molten center. Avoid using chocolate chips—they tend to hold their shape too much. A square of chocolate works best for a gooey, melty center.
- Don’t Skip the Grease: Greasing your mug or ramekin is crucial for easy removal. You don’t want your perfect lava cake to stick and break apart when you try to dig in.
- Customize the Texture: If you want a slightly cakier texture, add a tablespoon more flour. For a gooey-er consistency, reduce the flour a little, or add a dash more milk.
Creative Variations to Try
- Peanut Butter Lava Cake: Add a spoonful of peanut butter to the center of the cake before microwaving for a salty-sweet twist. It creates a creamy, indulgent surprise when you break into the cake.
- Caramel Lava Cake: Swap out the chocolate center for a piece of caramel candy. As it melts, it will form a deliciously gooey, sweet lava center. You can also drizzle some caramel sauce on top for extra flavor.
- Nutty Lava Cake: If you’re a fan of crunchy textures, add a small handful of chopped nuts like hazelnuts, walnuts, or almonds to the batter. These provide a nice contrast to the soft, molten center.
- Mocha Lava Cake: Want a coffee kick? Add a teaspoon of instant coffee or espresso powder to the dry ingredients for a mocha-flavored lava cake. It pairs wonderfully with the richness of the chocolate.
- Fruit-Filled Lava Cake: For a refreshing twist, try adding some fresh or frozen raspberries, strawberries, or cherries in the center along with the chocolate. The fruit will soften as the cake cooks and add a tart contrast to the rich chocolate.
Quick Tip:
If you’re making multiple servings, simply adjust the ingredient quantities and use individual ramekins for each cake. Just be mindful of the cooking time—microwave one at a time for the best results.
With these tips and variations, you can make your microwave lava cake as simple or as elaborate as you like. The possibilities are endless, so have fun experimenting and making this dessert your own!
Serving Suggestions
Now that your microwave lava cake is ready, it’s time to make it even more irresistible by pairing it with the perfect toppings and sides. Whether you’re enjoying it solo or sharing it with someone special, here are some ideas to elevate your dessert experience.
Classic Toppings to Complement Your Lava Cake
- Whipped Cream: A dollop of freshly whipped cream is a classic pairing for lava cake. Its light, airy texture balances the richness of the molten chocolate perfectly. If you want to add a little extra flavor, you can lightly sweeten the cream with a bit of vanilla extract or a sprinkle of powdered sugar.
- Vanilla Ice Cream: The cold, creamy texture of vanilla ice cream is a delicious contrast to the warm, gooey lava cake. As the ice cream melts into the cake, it creates a sweet, creamy puddle that enhances the chocolate’s richness.
- Berries: Fresh berries like raspberries, strawberries, or blueberries add a burst of tartness that cuts through the sweetness of the cake. They also bring a pop of color to your plate, making it look extra appetizing.
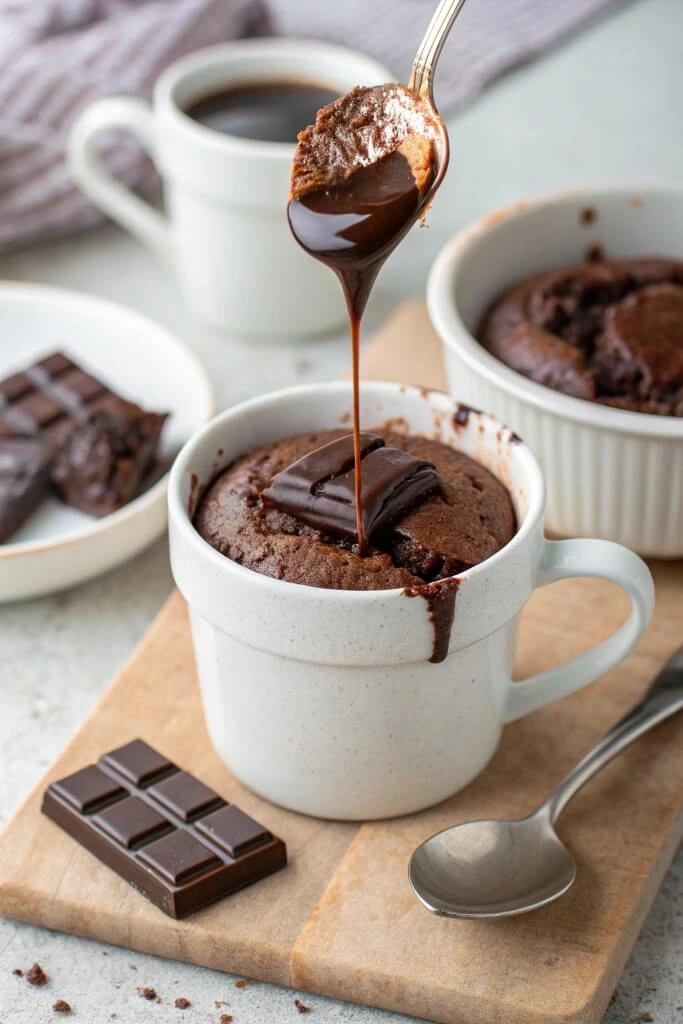
- Chocolate Sauce: If you’re a true chocolate lover, drizzle some extra chocolate sauce on top for an extra decadent treat. A rich, dark chocolate sauce adds even more depth to the cake’s flavor, intensifying the chocolate experience.
Serving Ideas for Special Occasions
- With Coffee or Espresso: For a more sophisticated touch, serve your lava cake with a cup of freshly brewed coffee or espresso. The bitterness of the coffee pairs wonderfully with the sweetness of the cake and creates a balanced flavor profile.
- On a Dessert Platter: If you’re hosting a dinner party or just want to impress your guests, consider making individual lava cakes and arranging them on a dessert platter with various toppings. This allows everyone to choose their favorite combination and adds an extra touch of elegance.
- With Caramel or Fruit Sauce: For a twist, drizzle some homemade caramel sauce or a fruity reduction (think raspberry or strawberry sauce) around the edge of the plate. These additions create an extra layer of flavor and make the dessert even more indulgent.
Pro Tip:
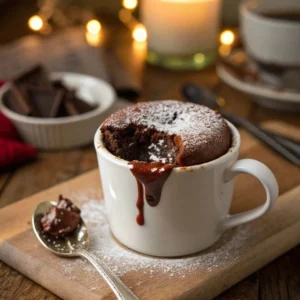
If you want to keep things simple, just enjoy the lava cake straight from the mug or ramekin! Sometimes, the cake is perfect on its own, and there’s no need to add extra toppings—especially when it’s as decadent as this one.
No matter how you choose to serve your microwave lava cake, these suggestions are sure to take it from great to unforgettable. The perfect combination of flavors and textures will leave everyone coming back for more!
Conclusion
And there you have it—a simple yet indulgent microwave lava cake that’s sure to satisfy your sweet tooth in minutes! Whether you’re in need of a quick treat or want to impress friends or family with minimal effort, this dessert delivers both in flavor and convenience. The best part? It’s a one-serving wonder, which means no leftovers to tempt you (unless you decide to make a second batch, of course!).
Why You’ll Love This Recipe:
- Quick and Easy: No need to preheat an oven or worry about complicated steps. In just a few minutes, you’ll have a warm, molten dessert ready to go.
- Customizable: Whether you prefer a rich dark chocolate center or a sweet fruit-filled surprise, you can adjust the recipe to suit your tastes.
- Perfect for Any Occasion: Whether you’re having a cozy night in or entertaining guests, this microwave lava cake is sure to impress. It’s a simple way to elevate any meal with a touch of indulgence.
So go ahead—treat yourself to this decadent dessert whenever the mood strikes. It’s the perfect balance of convenience, deliciousness, and personalization, making it your new go-to sweet treat!
Happy baking, and don’t forget to get creative with your toppings and mix-ins. The possibilities are endless!
Microwave Lava Cake
Ingredients
- 2 tablespoons butter melted: Adds richness and helps create that perfect texture for the cake.
- 2 tablespoons all-purpose flour: The base of the cake giving it structure while keeping it light.
- 2 tablespoons sugar: A touch of sweetness to balance out the richness of the chocolate.
- 1 tablespoon unsweetened cocoa powder: This is the key to that deep chocolatey flavor you’re after.
- 1/4 teaspoon baking powder: A small amount to give the cake a light rise.
- Pinch of salt: Enhances the sweetness and flavor of the chocolate.
- 2 tablespoons milk: To make the batter smooth and moist.
- 1/4 teaspoon vanilla extract: Adds warmth and depth to the flavor.
- 1 tablespoon dark chocolate or semi-sweet: This will form your molten lava center, creating that gooey surprise in every bite.
Instructions
Prepare Your Mug or Ramekin
- Choose a microwave-safe mug or ramekin (around 6–8 ounces in size) to ensure the cake cooks evenly. Lightly grease the inside with butter or non-stick spray to prevent sticking. This is essential for that perfect molten center!
Melt the Butter
- In your chosen mug or ramekin, melt the butter in the microwave for about 20-30 seconds. Keep an eye on it to avoid overheating.
Mix Dry Ingredients
- Once the butter has melted, add the sugar, cocoa powder, flour, baking powder, and salt to the mug. Stir well with a spoon or a small whisk until the ingredients are fully combined. You should have a smooth, thick batter.
Add Wet Ingredients
- Stir in the milk and vanilla extract to bring everything together. You’ll notice the batter becoming a bit smoother and lighter in texture, which is exactly what you want.
Create the Lava Center
- Gently press a piece of dark chocolate into the center of the batter. This will melt into a gooey, molten center as the cake cooks—your lava effect!
Microwave the Cake
- Microwave your lava cake on high for about 1 minute and 10 seconds, though microwave times may vary. Start checking at around 1 minute to see if the cake has risen and formed a soft, slightly wet center. You want the outer edges to be set, but the center should still look a little gooey. If it needs more time, continue to microwave in 10-second increments.
Let It Rest
- Once done, let the cake sit for 1–2 minutes. This gives the lava center time to set a little and cool down enough to avoid burning your tongue when you dig in.
Video
Notes
- Prep Time: 5 minutes
- Cook Time: 1 minute
- Total Time: 6 minutes
- Servings: 1
- Calories: ~450 kcal (varies based on ingredients)
FAQs
You’ve got your microwave lava cake ready, but you might have a few lingering questions. No worries! Here are some of the most common queries and helpful answers to guide you through making this delicious dessert.
1. Can I make this lava cake ahead of time?
While microwave lava cake is best enjoyed fresh, you can prepare the batter in advance. Store it in the fridge for up to 24 hours, and when you’re ready to bake, simply microwave it for the recommended time. This can save you time when you’re craving dessert or entertaining guests!
2. My lava cake didn’t turn out gooey in the center. What went wrong?
The key to that perfect molten center is not overcooking it. If your cake was overcooked, the center may have solidified. Make sure to check it after 1 minute, and if the edges are set and the center still looks soft, it’s ready. Microwave power can vary, so feel free to adjust the cooking time in small increments.
3. Can I make lava cakes in a larger batch?
If you want to make multiple servings, you can absolutely scale up the recipe. However, be mindful that microwaving times may change slightly. For best results, microwave each lava cake individually in its own mug or ramekin to ensure even cooking.
4. Can I use a different type of chocolate for the molten center?
Absolutely! While dark chocolate is most commonly used for its rich, smooth texture, you can swap it for semi-sweet, milk chocolate, or even white chocolate. Keep in mind that milk or white chocolate will yield a sweeter, less intense flavor.
5. Can I make this lava cake gluten-free?
Yes! To make a gluten-free version, simply swap out the all-purpose flour for a gluten-free flour blend. Make sure to check the flour mix for any added thickening agents to ensure your lava cake still has the right texture.
6. Can I add fruit or other fillings to the center?
Definitely! Feel free to get creative with your fillings. Fresh berries, peanut butter, or caramel can all be added to the center of your microwave lava cake. Just be careful not to overload it, as too much filling could interfere with the cake’s ability to cook properly in the microwave.
7. How do I store leftover lava cake?
Store any leftovers in an airtight container at room temperature, and enjoy within two days for the best texture and flavor. When ready to eat, microwave for 10-15 seconds to bring back its soft, gooey texture.
Feel confident with these FAQs in your back pocket, and now you can make the most of your microwave lava cake every time! Whether you’re baking it just for yourself or for a group, this dessert is sure to delight and impress.
Craving more quick and delicious chocolate treats? Check out our 3 Ingredient Banana Brownies for another simple and indulgent dessert you can whip up in no time!