
A Stitch birthday cake is the perfect way to bring Disney’s mischievous blue alien to life at a Lilo and Stitch-themed birthday party. Whether you’re celebrating a birthday girl or a Stitch fan of any age, this cake captures the fun, quirky personality of the beloved character.
From simple Stitch birthday cake designs to elaborate fondant creations, there are endless ways to customize this cake to match your party theme. Two options for a Stitch birthday celebration include tiered birthday cakes or sheet cakes with edible toppers on cupcakes. The key is to create a vibrant, eye-catching design using buttercream, edible decorations, and themed cake toppers.
In this guide, you’ll learn how to make a Stitch birthday cake step by step, explore creative decoration ideas, and get expert tips for making your cake look amazing. Whether you’re a beginner or an experienced baker, this recipe will help you craft a cake that’s as fun as the Disney Stitch character itself.
Table of Contents
Key Benefits
If you’re planning a Lilo and Stitch birthday party, a Stitch birthday cake is a must-have centerpiece. It’s fun, colorful, and full of personality—just like Stitch himself! Whether you go all out with fondant details or keep it simple with buttercream and a cute topper, this cake is sure to bring smiles.
1. It Brings the Party Theme to Life
There’s something magical about a cake that matches the party theme. A Stitch cake makes the celebration feel extra special, especially when paired with Hawaiian decorations, Stitch-themed party supplies, and tropical colors. Think of it as the edible highlight of your dessert table!
2. It Works for All Skill Levels
Not a professional baker? No problem! A simple Stitch birthday cake can be as easy as a blue frosted sheet cake with a fun edible image or cake topper. If you love decorating, you can get creative with fondant Stitch figures, buttercream textures, or even hand-painted details. There’s no right or wrong way—just have fun with it!
3. It’s Perfect for All Ages
You don’t have to be a kid to love Disney Stitch! Whether you’re making this cake for a birthday girl, a big Stitch fan, or even an adult who grew up watching Lilo & Stitch, it’s a hit at any age. It’s one of those cakes that sparks joy the moment people see it.
4. Budget-Friendly Options Make It Easy
You don’t need fancy tools or expensive ingredients to make a great Stitch-themed cake. A simple homemade cake with blue buttercream and a Stitch birthday cake topper set can look just as impressive as a custom bakery creation. If you’re on a budget, you can even turn a basic store-bought cake into a Stitch party cake with a few creative touches.
5. It’s a Showstopper!
Let’s be honest—when you bring out a Stitch birthday cake, people are going to talk about it! With its iconic blue fur, big ears, and mischievous grin, this cake isn’t just dessert—it’s part of the party. Whether you make it yourself or order it, it’s guaranteed to be a hit.
Ingredients
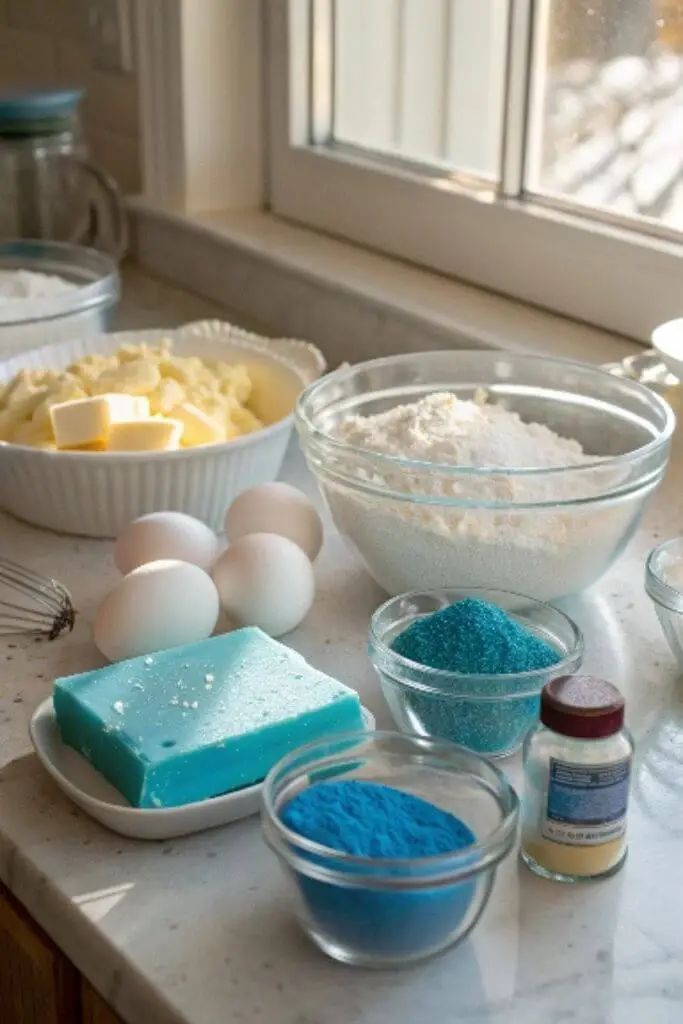
Making a Stitch birthday cake at home is easier than you think! Whether you’re keeping it simple with a sheet cake or going all out with fondant decorations, these ingredients will help you create a delicious and eye-catching cake.
For the Cake
You can use your favorite cake flavor, but a classic vanilla or chocolate cake works well. If you want a more tropical feel (inspired by Lilo and Stitch’s Hawaiian setting), try coconut or pineapple cake!
- 2 ½ cups all-purpose flour
- 2 ½ tsp baking powder
- ½ tsp salt
- 1 cup unsalted butter, softened
- 2 cups granulated sugar
- 4 large eggs
- 1 tbsp vanilla extract
- 1 cup whole milk
For the Buttercream Frosting
This smooth and creamy frosting will help you achieve that signature blue Stitch cake look.
- 1 ½ cups unsalted butter, softened
- 4 cups powdered sugar
- 2 tbsp heavy cream (or milk)
- 1 tsp vanilla extract
- Blue gel food coloring (for Stitch’s fur)
- Purple gel food coloring (for ear details, if decorating)
For Decoration
You can get as creative as you like! Here are some decoration ideas to bring Stitch to life:
- Edible cake topper or Stitch birthday cake topper set (for an easy decorating option)
- Fondant in blue, purple, and black (if shaping Stitch’s face or ears)
- White and black candy melts (for eyes and facial details)
- Edible icing paper (to place over fondant for a detailed Stitch image)
- Piping bags and decorating tips (for buttercream details)
This recipe makes enough for a two-layer 8-inch cake or a half-sheet cake. If making a tiered Stitch cake or extra cupcakes, you can double the ingredients.
How to Make a Stitch Birthday Cake
Alright, so you’ve got your Stitch-themed birthday party planned, and now it’s time to make the cake! Making a Stitch birthday cake is way easier than it seems, and the best part? It’s a total showstopper! Here’s a fun, step-by-step guide to help you pull it off, even if you’re not a professional baker (spoiler: I’m not either!).
1. Bake the Cake
Let’s start with the basics: baking the cake. Trust me, this is the easiest part. Preheat your oven to 350°F (175°C), and grease two 8-inch round cake pans (or a sheet pan if you’re going big).
- In a mixing bowl, combine your flour, baking powder, and salt, and give it a quick whisk to ensure everything is well mixed. Set that aside for now.
- In a separate large bowl, cream together your butter and sugar until it’s light and fluffy—about 3-4 minutes with an electric mixer. If you don’t have one, no worries, just go old-school with a whisk.
- Add the eggs to the mixture one by one, mixing thoroughly after each addition to keep everything smooth and well-incorporated. Stir in the vanilla extract (this step smells so good).
- Gradually mix in the dry ingredients and the milk, alternating between the two. I like to start and end with the dry ingredients. Just mix until it’s all combined—don’t overdo it.
- Pour the batter into the pans and bake for 25-30 minutes, or until a toothpick comes out clean when you test the center. Let the cakes cool for about 10 minutes in the pans before transferring them to a wire rack to cool completely.
2. Make the Buttercream Frosting
While the cakes cool, let’s make the buttercream. This is where the magic happens—the frosting is really what will give your cake that fun, vibrant look.
- Start by beating your butter until it’s super soft and creamy.
- Gradually add the powdered sugar, about a cup at a time, mixing it in until the frosting is smooth.
- Stir in the vanilla extract and heavy cream, and continue to beat until everything’s fluffy and perfect.
- Now, divide your frosting into two bowls. In one bowl, add blue food coloring (this will be for Stitch’s iconic blue color). In the other, add purple food coloring for his ears and any other fun details.
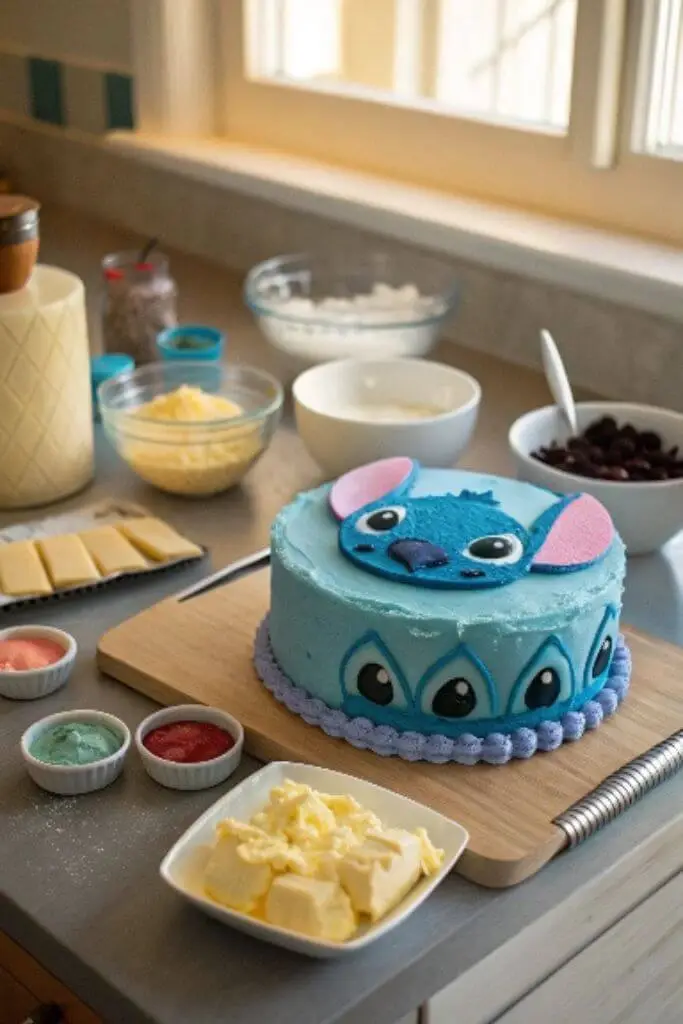
3. Frost the Cake
Once your cakes are cool, it’s time to frost! Don’t rush this step—it’s where you can really make the cake your own.
- Start with a thin layer of frosting all over the cake, which is called a crumb coat. This helps lock in the crumbs so your final layer is smooth. Pop the cake in the fridge for about 15 minutes to set that crumb coat.
- After the crumb coat is set, go ahead and apply a thicker layer of blue buttercream. You can smooth it out with a spatula or leave it a bit textured, depending on what kind of look you’re going for.
- If you want to get fancy, pipe some purple frosting around the top or the edges to give Stitch’s ears that cool contrast.
4. Add the Decorations
Here’s where it gets really fun. This is your chance to make Stitch’s face come to life! You’ve got a few options here, depending on how much time or patience you have.
- If you’re feeling crafty, roll out fondant to create Stitch’s face and ears. You can make it as detailed as you want, adding black fondant for his eyes and purple fondant for the inner parts of his ears.
- Not into fondant? No problem! You can use edible cake toppers with Stitch’s face printed on them or even use edible images to make it super easy. Just place it right on top of the cake, and bam—instant Stitch!
- You can also go extra by piping some buttercream fur on the sides of the cake. A star tip works great for this, giving it that cute, textured look.
- To finish it off, add some Hawaiian-themed decorations, like hibiscus flowers, to tie in the Lilo and Stitch vibe.
5. Final Touches
Now that your cake is decorated, take a moment to admire your work—you just created a cake worthy of Stitch himself! If you want to go even further, add some extra touches, like candy melts for eyes or fondant flowers around the cake. It’s all about making it your own and having fun with the process!
Once you’ve added the finishing touches, your Stitch birthday cake is ready to be served and celebrated. Whether it’s a big Stitch party or a small gathering, this cake is sure to be the highlight.
Pro Tips and Variations
Alright, now that you’ve got your Stitch birthday cake recipe down, it’s time to talk about some fun little tweaks and pro tips to really make this cake your own. Think of this as your do-it-your-way section, where you can get creative and add your personal touch to the cake. Many basic alterations will turn your cake into an even more thrilling and unforgettable delight.
1. Play with Color!
Stitch’s amazing bright blue fur color looks cute but trying different colors would add tremendous fun to the design. The blue color palette does not need to be limited to just one shade because variety will really spice up your creation. An ombré color design would create a truly wonderful appearance if you are open to trying something different. The color gradient starts with dark blue that shifts towards lighter blues near the top of the decoration. A final design touch comes from pink or purple accents at the edges which add additional charm to the cake.
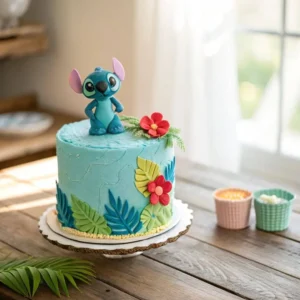
2. Top It Off with a Figure
Want to go big? Add a Stitch figurine right on top of the cake. Such tiny cute figures are accessible at any party shop along with online retailers. This addition will transform your cake to something attractive while providing the birthday person with a precious keepsake after celebrations end. People find Stitch absolutely cute because his large ears combine with his playful facial expression.
3. Layer It Up
Enhance your birthday treat by building special colorful interior layers into your cake. Imagine cutting into your Stitch cake and seeing a rainbow of colors! You could use some fun sprinkles or even a bit of chocolate ganache between the layers for a sweet surprise. I’ve also seen people hide mini cake pops inside their cakes, and it’s such a cool touch when it’s cut open. It’s like a hidden treasure!
4. Mix Up the Flavors
Your cake should never be restricted to the basic vanilla flavor. If you want to switch things up, why not go for something like chocolate cake? Or if you want to stick with the Hawaiian theme, coconut or pineapple cake could bring in a tropical twist. If you want a lighter option, lemon cake with a hint of zest will totally complement the sweetness of the frosting. You have absolute freedom to choose any flavor combination since the rules are completely waived!
5. Buttercream or Fondant?
I get this question all the time: buttercream or fondant? Your choice will depend on your specific objectives in this situation. Buttercream is delicious and super easy to work with. Its desirable characteristics include being soft and fluffy while maintaining a popularity among everyone because of its fluffiness. But if you want a smoother, sleeker look, fondant is great for getting those sharp edges and polished details. You should use buttercream frosting for the cake edges while stitching details would work best with fondant.
6. Make It an Activity!
Here’s a fun idea if you’re hosting a Stitch birthday party: set up a little cake-decorating station for the kids! At birthday parties the children can get fascinated by the candy while they enjoy their creativity through decorating activities. You can give them little Stitch-themed toppers, some colored frosting, and maybe even some edible glitter (because kids love sparkle). The activity becomes entertaining while allowing each guest to create their special birthday dessert.
7. Bring in the Hawaiian Vibes
If you’re embracing the whole Hawaiian theme from Lilo and Stitch, there are so many ways to get creative with it. Think edible hibiscus flowers, cute little pineapple decorations, or even a bit of coconut flakes around the base of the cake. You could even use some palm leaves or tropical-themed cake toppers to tie it all together. Small decorative elements that recreate beachy and tropical sensations will produce maximum impact.
The provided advice serves as your initial foundation. Whether you want to keep it simple or go all out, there are so many ways to make your Stitch birthday cake one-of-a-kind. We should approach this process with enjoyment while adding original touches to make the birthday cake unique. The process of baking will bring pleasure while the finished product creates beaming grins among your audience.
Serving Suggestions
Now that you’ve got your stunning Stitch birthday cake all ready to go, let’s talk about how to serve it up in style. Whether you’re hosting a big party or a small gathering, these serving ideas will help you make the most of your cake and keep the celebration going.
1. Individual Cake Slices with a Twist
A great way to serve cake at a party is to cut it into neat, individual slices. But don’t stop there—add a personal touch by placing each slice on a fun, themed plate. Maybe some little Stitch figurines or even a sprinkle of edible glitter will add that extra sparkle. It’s a simple way to make each guest feel special.
2. Serve with a Side of Ice Cream
Cake and ice cream? Yes, please! To really take your Stitch cake to the next level, serve it alongside some vanilla or coconut ice cream. If you want to keep things on theme, look for Hawaiian-inspired ice cream flavors (think: coconut, pineapple, or even tropical sorbet). You can even serve a small scoop of ice cream in fun, colorful bowls to tie everything together.
3. Cupcakes for Easy Grab-and-Go
If you’re having a large group of guests or little ones running around, cupcakes might be a better option. You can either make mini versions of your Stitch birthday cake or just go for regular cupcakes with adorable Stitch toppers. They’re easy to serve, and the kids will love having their own little piece of cake to nibble on. Plus, they’re perfect for anyone who wants a smaller treat!
4. Add Fun, Themed Drinks
Make the party feel even more festive by serving a Hawaiian-inspired drink to go with the cake. Think tropical punch, fruit-infused water, or even coconut milkshakes. You could serve the drinks in fun cups with Stitch-themed straws or mini umbrellas for a little extra flair. It’ll make the whole experience feel like a tropical getaway!
5. A Cake Buffet with Other Treats
If you’re serving multiple desserts at the party, set up a dessert buffet with the Stitch cake as the main event. Pair it with some other fun treats like themed cookies, Stitch cupcakes, or even fruit kabobs with pineapple, strawberries, and other tropical fruits. A little bit of everything will give your guests plenty of choices and make your dessert table look amazing.
6. Personalize with Party Favors
To really make your cake stand out as part of the whole celebration, think about handing out small party favors along with each slice. Maybe a mini Stitch figurine, some Stitch-themed stickers, or a small bag of tropical-flavored candy. It’s an extra touch that will keep the party feeling personal, and your guests will love the thoughtful gesture.
Remember, when it comes to serving your Stitch birthday cake, there are no hard and fast rules. It’s all about creating an atmosphere where everyone feels relaxed and enjoys the delicious cake you’ve put so much love into making. So, whether you’re serving it on beautiful plates or handing out cupcakes, just enjoy the moment and the smiles that come with it!
Conclusion
And there you have it—your very own Stitch birthday cake, ready to steal the spotlight at the party! This recipe enables bakers of all experience levels to create fond memories through fun birthday baking projects.
From the fluffy cake layers to the creamy, colorful frosting and those adorable Stitch-themed decorations, this cake brings a little bit of magic to any birthday celebration. The recipe gives you ample opportunity to customize your creation according to your personal preferences. No matter which color scheme you choose this cake will deliver spectacular results. You can pick traditional blue style or unleash your creativity in the design process.
This cake provides endless opportunities for customization because you decide whether it will be basic or extravagant. Whether you’re serving it at a Hawaiian-themed party, a kids’ birthday bash, or just because, it’s guaranteed to be a hit. This cake delivers juicy flavor along with its unique decorations and playful spirit which people will talk about even after the party ends.
So, grab your apron, get creative, and let this Stitch birthday cake be the centerpiece of a birthday celebration full of laughter, joy, and maybe even a few mischief-filled moments (just like Stitch himself!).
To further enhance your cake decorating skills, consider enrolling in the “Techniques of Cake Decorating” course offered by the Institute of Culinary Education. This course delves into advanced decorating methods and creative designs, providing hands-on experience to transform your cakes from ordinary to extraordinary.
Stitch Birthday Cake
Ingredients
For the Cake
- You can use your favorite cake flavor but a classic vanilla or chocolate cake works well. If you want a more tropical feel (inspired by Lilo and Stitch’s Hawaiian setting), try coconut or pineapple cake!
- 2 ½ cups all-purpose flour
- 2 ½ tsp baking powder
- ½ tsp salt
- 1 cup unsalted butter softened
- 2 cups granulated sugar
- 4 large eggs
- 1 tbsp vanilla extract
- 1 cup whole milk
For the Buttercream Frosting
- This smooth and creamy frosting will help you achieve that signature blue Stitch cake look.
- 1 ½ cups unsalted butter softened
- 4 cups powdered sugar
- 2 tbsp heavy cream or milk
- 1 tsp vanilla extract
- Blue gel food coloring for Stitch’s fur
- Purple gel food coloring for ear details, if decorating
For Decoration
- You can get as creative as you like! Here are some decoration ideas to bring Stitch to life:
- Edible cake topper or Stitch birthday cake topper set for an easy decorating option
- Fondant in blue purple, and black (if shaping Stitch’s face or ears)
- White and black candy melts for eyes and facial details
- Edible icing paper to place over fondant for a detailed Stitch image
- Piping bags and decorating tips for buttercream details
Instructions
Bake the Cake
- Let’s start with the basics: baking the cake. Trust me, this is the easiest part. Preheat your oven to 350°F (175°C), and grease two 8-inch round cake pans (or a sheet pan if you’re going big).
- In a mixing bowl, combine your flour, baking powder, and salt, and give it a quick whisk to ensure everything is well mixed. Set that aside for now.
- In a separate large bowl, cream together your butter and sugar until it’s light and fluffy—about 3-4 minutes with an electric mixer. If you don’t have one, no worries, just go old-school with a whisk.
- Add the eggs to the mixture one by one, mixing thoroughly after each addition to keep everything smooth and well-incorporated. Stir in the vanilla extract (this step smells so good).
- Gradually mix in the dry ingredients and the milk, alternating between the two. I like to start and end with the dry ingredients. Just mix until it’s all combined—don’t overdo it.
- Pour the batter into the pans and bake for 25-30 minutes, or until a toothpick comes out clean when you test the center. Let the cakes cool for about 10 minutes in the pans before transferring them to a wire rack to cool completely.
Make the Buttercream Frosting
- While the cakes cool, let’s make the buttercream. This is where the magic happens—the frosting is really what will give your cake that fun, vibrant look.
- Start by beating your butter until it’s super soft and creamy.
- Gradually add the powdered sugar, about a cup at a time, mixing it in until the frosting is smooth.
- Stir in the vanilla extract and heavy cream, and continue to beat until everything’s fluffy and perfect.
- Now, divide your frosting into two bowls. In one bowl, add blue food coloring (this will be for Stitch’s iconic blue color). In the other, add purple food coloring for his ears and any other fun details.
Frost the Cake
- Once your cakes are cool, it’s time to frost! Don’t rush this step—it’s where you can really make the cake your own.
- Start with a thin layer of frosting all over the cake, which is called a crumb coat. This helps lock in the crumbs so your final layer is smooth. Pop the cake in the fridge for about 15 minutes to set that crumb coat.
- After the crumb coat is set, go ahead and apply a thicker layer of blue buttercream. You can smooth it out with a spatula or leave it a bit textured, depending on what kind of look you’re going for.
- If you want to get fancy, pipe some purple frosting around the top or the edges to give Stitch’s ears that cool contrast.
Add the Decorations
- Here’s where it gets really fun. This is your chance to make Stitch’s face come to life! You’ve got a few options here, depending on how much time or patience you have.
- If you’re feeling crafty, roll out fondant to create Stitch’s face and ears. You can make it as detailed as you want, adding black fondant for his eyes and purple fondant for the inner parts of his ears.
- Not into fondant? No problem! You can use edible cake toppers with Stitch’s face printed on them or even use edible images to make it super easy. Just place it right on top of the cake, and bam—instant Stitch!
- You can also go extra by piping some buttercream fur on the sides of the cake. A star tip works great for this, giving it that cute, textured look.
- To finish it off, add some Hawaiian-themed decorations, like hibiscus flowers, to tie in the Lilo and Stitch vibe.
Final Touches
- Now that your cake is decorated, take a moment to admire your work—you just created a cake worthy of Stitch himself! If you want to go even further, add some extra touches, like candy melts for eyes or fondant flowers around the cake. It’s all about making it your own and having fun with the process!
Video
Notes
- Prep Time: 45 minutes
- Cook Time: 30-35 minutes
- Total Time: 1 hour 15 minutes
- Servings: 12-16 servings
- Calories: Approximately 350-400 calories per slice (depending on size and frosting)
FAQs
1. How to have a kids’ birthday cake on a budget?
It’s totally possible to make a fun, memorable cake without breaking the bank! You don’t have to go all out with fancy decorations—simple, creative touches like a Stitch birthday cake topper or homemade fondant accents can do the trick. You can also opt for a simple sheet cake and use colorful food coloring to create fun patterns and designs. Plus, making the cake from scratch is often cheaper than buying a premade one. Keep it fun, keep it simple, and most importantly, keep it affordable!
2. What is the most favorite birthday cake?
While every birthday is unique, some favorites tend to stand out across the board. Chocolate cake and vanilla cake are classics, but for a themed celebration like this one, you can’t go wrong with a funfetti or a buttercream frosted cake. For a Stitch birthday cake, a vibrant cake with lots of playful colors and designs will always make a lasting impression, no matter the flavor inside.
3. How do I make a simple cake look good?
You don’t need to be a professional baker to make a cake look gorgeous! Start with a smooth, clean base of frosting (buttercream works wonders). Then, use a themed cake topper like a cute Stitch figure or even create your own decorations with fondant or edible icing. Small, simple touches like colorful sprinkles or a creative border around the cake will instantly elevate it. And if you’re short on time, a store-bought topper is an easy way to make your cake shine without the effort.
4. Which cake is in trend now?
Lately, fun, interactive cakes are all the rage! People love cakes that bring a little extra wow factor—like those that reveal a surprise inside when cut or cakes that feature popular characters from beloved movies, like Stitch. Drip cakes, where icing or ganache drips down the sides, are also super trendy right now. These fun touches bring personality to the cake and make it feel extra special for any celebration.
5. How to make cake decorations at home?
Making your own cake decorations can be as simple or as complex as you want. If you’re going for a Stitch-themed cake, consider using fondant to mold cute characters or shapes. You can also buy edible cake decorations and simply place them on top of your cake for a quick fix. For a personal touch, try creating your own cake topper by printing a cute design on edible paper. Another easy idea is to use buttercream piping to create flowers, patterns, or even little details like Stitch’s ears!
6. How do I choose a cake design?
Choosing a cake design starts with thinking about the theme of your party. For a Stitch birthday cake, you’ll want to incorporate colors and elements from the movie—think blue frosting and tropical themes like hibiscus flowers or palm leaves. If you’re feeling creative, you could even add a fun Stitch cake topper or fondant decorations to bring the cake to life. The key is to pick something that reflects the party’s vibe and makes the birthday child feel extra special. Don’t overthink it—go with what feels fun and fits the theme, and you’ll have a winner!
For more inspiration on creating delightful themed cakes, check out our step-by-step guide on crafting a charming Hello Kitty Birthday Cake.