

If you’ve ever craved a dessert that’s both crispy and irresistibly sweet, this kataifi recipe is for you. With its delicate, golden strands of shredded pastry wrapped around a rich nut filling and soaked in fragrant honey syrup, it’s a treat that embodies the best of Greek and Mediterranean sweets.
Whether you’re making it for a festive gathering or simply indulging your sweet tooth, this crunchy, buttery dessert is surprisingly easy to prepare. Plus, you can customize it with walnuts, pistachios, or almonds to suit your taste. Ready to bring a touch of tradition to your kitchen? Let’s get started!
Table of Contents
Key Benefits of This Kataifi Recipe
Making kataifi at home isn’t just about enjoying a delicious dessert—it’s about embracing a time-honored tradition. Here’s why you’ll love this recipe:
Crispy & Golden Perfection – The delicate kataifi pastry bakes into a beautifully crunchy texture, creating the perfect contrast with the sweet, aromatic honey syrup.
Rich & Flavorful Filling – A blend of walnuts, pistachios, or almonds with cinnamon and sugar adds a warm, nutty depth to every bite.
Easy Yet Impressive – Despite its elegant appearance, this recipe is simple to prepare, making it ideal for both special occasions and everyday indulgence.
Customizable & Versatile – Swap the nuts, adjust the sweetness, or add a touch of orange zest for a personalized twist on this Greek dessert classic.
A Taste of Tradition – This authentic recipe lets you recreate the flavors of Mediterranean sweets right in your own kitchen, bringing a piece of history to your table.
With these delicious benefits in mind, let’s gather our ingredients and start baking!
Ingredients for the Perfect Kataifi Recipe
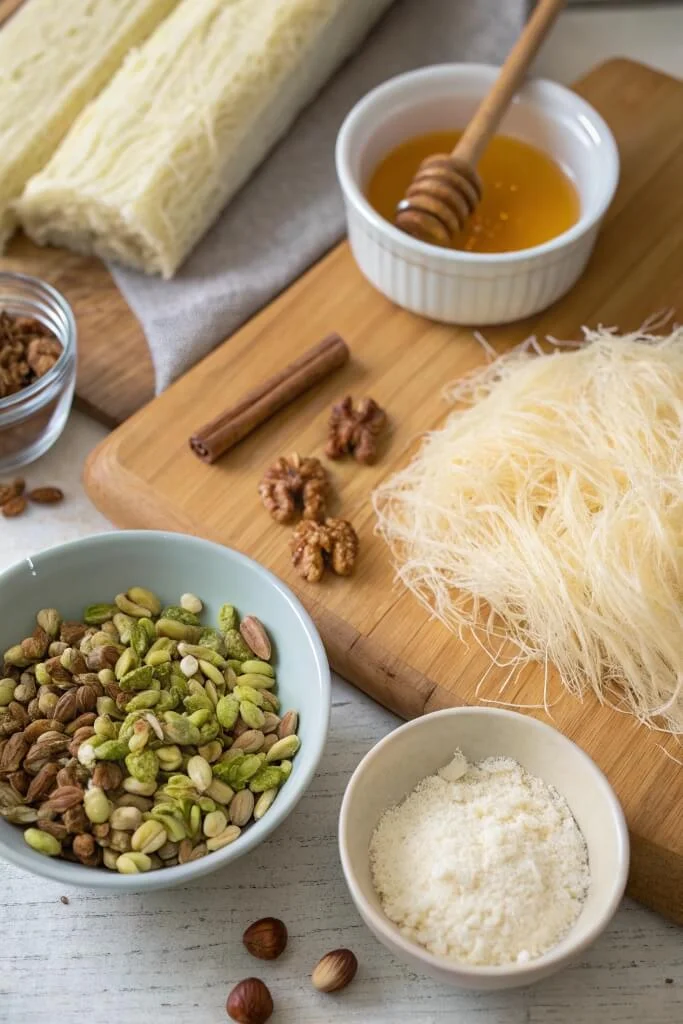
Before we dive into the process, let’s gather everything you need to create this crispy, syrup-soaked dessert. Using high-quality ingredients ensures that every bite is buttery, nutty, and irresistibly sweet.
For the Kataifi Pastry:
- 12 oz (340g) kataifi dough – Gently separate the strands for a light, flaky texture.
- 1 cup (225g) unsalted butter, melted – Adds rich flavor and helps achieve that golden crunch.
For the Nut Filling:
- 1 ½ cups (180g) walnuts or pistachios – Finely chopped for a flavorful, textured bite.
- 2 tbsp granulated sugar – Enhances the natural sweetness of the nuts.
- 1 tsp ground cinnamon – Adds warmth and depth to the filling.
For the Honey Syrup:
- 1 cup (240ml) water – The base for the syrup.
- 1 cup (200g) granulated sugar – Balances the sweetness and creates a glossy finish.
- ½ cup (120ml) honey – Adds a rich, floral sweetness.
- 1 tbsp lemon juice – Prevents crystallization and enhances flavor.
- 1 cinnamon stick & 2 cloves – Infuses the syrup with a warm, aromatic touch.
Optional Add-Ins:
- Orange or lemon zest – A citrusy twist for extra brightness.
- Rose or orange blossom water – A few drops for an authentic Middle Eastern touch.
Now that we have everything ready, let’s move on to the step-by-step process of making this delightful Greek dessert!
How to Make Kataifi Recipe
Now that we have all our ingredients ready, let’s get started on making this crispy, golden kataifi! The process is simpler than you might think, and I’m here to guide you step by step.
Step 1: Prepare the Nut Filling
- In a mixing bowl, combine the chopped walnuts (or pistachios) with the sugar and ground cinnamon.
- Stir well to evenly coat the nuts with the sugar and spice. This filling is the heart of your kataifi, so make sure it’s well-mixed.
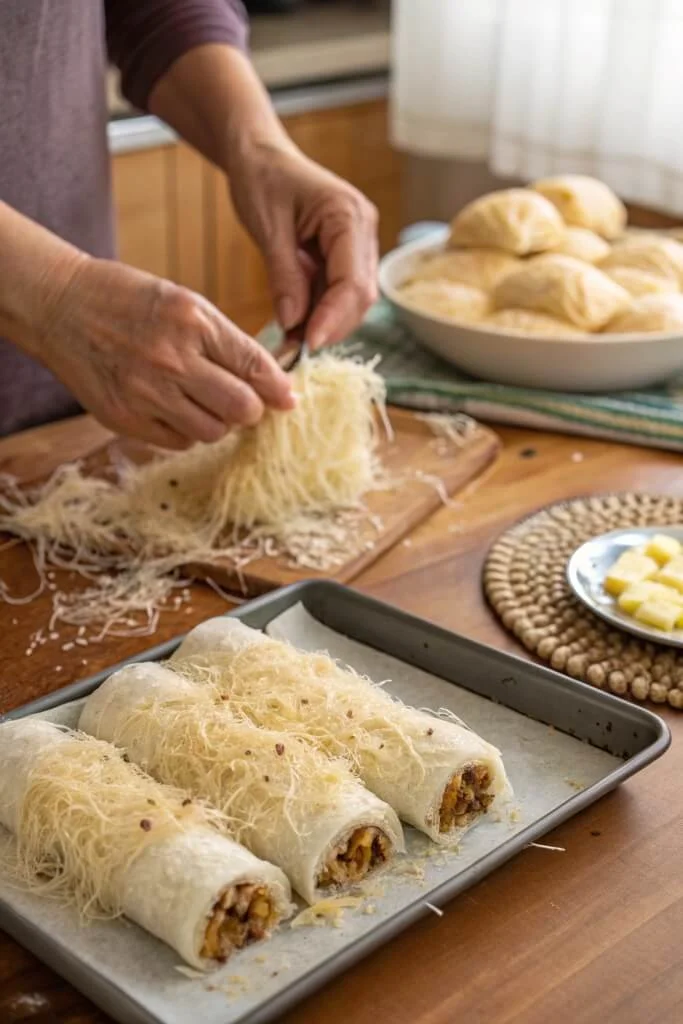
Step 2: Prepare the Kataifi Pastry
- Gently pull apart the strands of kataifi dough, separating them as much as possible. Don’t worry if they’re a little tangled—just work with them slowly.
- Brush a baking dish (about 9×13 inches) with melted butter. Take a handful of the separated kataifi dough and spread it evenly in the dish.
- Drizzle a little more melted butter over the dough. The butter is key to achieving that crispy, flaky texture you’ll love!
Step 3: Assemble the Kataifi Rolls
- Sprinkle a generous amount of the nut filling over the layer of dough in the baking dish.
- Carefully roll the dough around the nuts, forming small bundles. Don’t worry if the rolls aren’t perfect—this dessert is rustic and charming in its imperfections!
- Once all the kataifi dough is rolled up, drizzle the remaining melted butter over the top.
Step 4: Bake to Perfection
- Preheat your oven to 350°F (175°C).
- Bake the kataifi for 30-40 minutes or until the dough is golden brown and crispy. Keep an eye on it, as baking times may vary slightly based on your oven. The kataifi pastry should be beautifully golden and crunchy by the end!
Step 5: Make the Honey Syrup
- While the kataifi is baking, prepare the syrup. In a saucepan, combine water, sugar, honey, lemon juice, and the cinnamon stick and cloves.
- Gently heat the mixture over medium heat, allowing it to come to a simmer while stirring occasionally until the sugar dissolves completely.
- Let the syrup simmer for 10-15 minutes until it thickens slightly, then remove it from heat.
Step 6: Soak the Kataifi in Syrup
- Once the kataifi is done baking and has cooled slightly, pour the hot honey syrup evenly over the rolls. Let the syrup soak into the kataifi for about 10-15 minutes. You’ll notice the dough will become beautifully sticky and sweet.
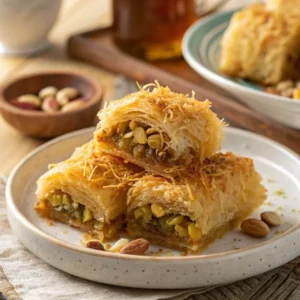
Step 7: Serve and Enjoy
After allowing the syrup to soak in, your kataifi is ready to be enjoyed! You can garnish with a dusting of cinnamon or some crushed pistachios for extra flair.
This dessert is perfect for special occasions, or when you just want to treat yourself to something incredibly satisfying! Enjoy every crispy, syrupy bite!
Pro Tips and Variations for Kataifi Recipe
Now that you’ve made your kataifi recipe, here are some helpful tips and exciting variations to elevate your dessert even further. Whether you’re looking to adjust the flavor profile or try something new, these suggestions will make your kataifi even more delicious!
Pro Tips for Perfect Kataifi
- Use fresh kataifi dough: The fresher the dough, the crispier and more delicate the final result. If you can find it in a local market, it’s definitely worth it!
- Don’t skip the butter: The butter not only adds rich flavor but also helps the dough become beautifully golden and crisp. Be generous with it for the best results!
- Let the syrup cool slightly: Pouring hot syrup over the kataifi helps the pastry absorb the sweetness, but don’t let the syrup cool too much—it should still be warm when you drizzle it.
- Watch the baking time: Every oven is different, so keep an eye on your kataifi as it bakes. When it’s golden brown and crispy, you know it’s ready for syrup!
Exciting Variations to Try
- Nut-Free Kataifi: If you or your guests have nut allergies, simply omit the nuts and substitute with a combination of dried fruits like raisins or dried apricots for a unique twist.
- Spiced Syrup: For an extra layer of flavor, infuse the syrup with a few whole cardamom pods or vanilla beans. This adds a lovely aroma and complexity.
- Chocolate Kataifi: Add a drizzle of melted dark chocolate over the baked kataifi or mix in chocolate chips with the nut filling for a decadent treat.
- Coconut Kataifi: Mix shredded coconut into your nut filling for a tropical flavor that pairs wonderfully with the honey syrup.
- Mini Kataifi Rolls: Want to serve individual portions? Roll the dough into smaller bundles for bite-sized pieces that are perfect for sharing at parties or gatherings.
Make-Ahead Tip
Kataifi can be made ahead of time! Assemble the rolls and store them in an airtight container in the fridge. When you’re ready to serve, bake and pour over the syrup for a fresh, warm dessert. It’s a great way to save time when hosting a dinner or special event.
With these tips and variations, you can make this kataifi recipe uniquely yours while ensuring the perfect balance of crispy, sweet, and nutty in every bite! Enjoy experimenting!
Serving Suggestions for Kataifi Recipe
Now that your kataifi is ready to shine, let’s talk about the best ways to serve and enjoy it. This dessert is all about indulgence, so let’s make sure it’s presented in a way that highlights its beautiful texture and sweet flavor.
Serving Ideas to Elevate Your Kataifi
- Serve with a scoop of vanilla ice cream: The warm, crispy kataifi paired with creamy ice cream is a match made in dessert heaven. The cold ice cream contrasts beautifully with the syrup-soaked pastry.
- Garnish with crushed pistachios: A handful of crushed pistachios adds a pop of color and a crunchy texture that complements the kataifi’s delicate crunch. You can also sprinkle a little extra cinnamon for added warmth.
- Pair with a cup of Turkish coffee or tea: For an authentic Mediterranean experience, serve your kataifi with a small cup of strong coffee or a pot of herbal Greek tea. The rich, bold flavors of the drink balance out the sweetness of the dessert.
- Serve it at room temperature: While some may prefer it warm, kataifi is delicious at room temperature as well. Let it sit for about 10-15 minutes after soaking the syrup to allow the flavors to settle.
- For a festive touch: If you’re serving kataifi for a special occasion or gathering, arrange it on a decorative platter, and drizzle a little extra honey over the top. You can also garnish with edible flowers for a visually stunning presentation.
Creative Serving Styles
- Mini Kataifi Bites: If you’re hosting a gathering or party, cut the kataifi into small pieces or make mini rolls for individual servings. These bite-sized delights will make a statement at any dessert table!
- Kataifi Parfait: Layer the kataifi with yogurt or whipped cream in small glasses for a playful twist. Add some fresh berries on top for a burst of color and freshness.
- Drizzle with chocolate or fruit syrup: For a different flavor profile, drizzle melted dark chocolate or berry syrup over your kataifi before serving. This adds another layer of richness that pairs wonderfully with the nutty filling.
Make It a Showstopper
If you’re looking to truly impress your guests, serve the kataifi in individual portions with a beautiful plate setting. The contrast between the golden-brown pastry and the glossy syrup will make it a showstopper at any dinner party or holiday meal.
No matter how you choose to serve it, this kataifi recipe will surely be a crowd-pleaser that’s both indulgent and full of flavor. Enjoy every sweet, crunchy bite!
Conclusion for Kataifi Recipe
Congratulations, you’ve just made a delicious kataifi recipe! Whether it’s your first time making this sweet, flaky pastry or you’re a seasoned pro, the process is always rewarding. The combination of crispy kataifi dough, sweet honey syrup, and nutty filling creates a dessert that’s both comforting and indulgent.
Why You’ll Love This Kataifi Recipe
- Versatile & Customizable: You can easily tweak the filling, syrup, or even the type of nuts to suit your taste preferences in this kataifi recipe.
- Perfect for Special Occasions: Whether it’s a holiday, a family gathering, or just a sweet treat for yourself, kataifi adds a festive flair to any event.
- Authentic & Delicious: Every bite of this kataifi recipe brings you the perfect balance of texture and flavor, making it an authentic Middle Eastern-inspired dessert that everyone will love.
Enjoying Kataifi
The beauty of this kataifi recipe lies in how it can be shared and enjoyed with friends and family. Serve it as a showstopper at your next dinner party or make it for a cozy night in. The flavors only get better as they soak into the crispy dough, so feel free to make a big batch and enjoy it over a few days!
Thank you for following along with this kataifi recipe. I hope you find as much joy in making it as I do! Let me know how it turns out and feel free to experiment with the variations I mentioned. There’s always room to make this dish your own!
Enjoy your kataifi!
Kataifi Recipe
Ingredients
For the Kataifi Pastry:
- 12 oz 340g kataifi dough – Gently separate the strands for a light, flaky texture.
- 1 cup 225g unsalted butter, melted – Adds rich flavor and helps achieve that golden crunch.
For the Nut Filling:
- 1 ½ cups 180g walnuts or pistachios – Finely chopped for a flavorful, textured bite.
- 2 tbsp granulated sugar – Enhances the natural sweetness of the nuts.
- 1 tsp ground cinnamon – Adds warmth and depth to the filling.
For the Honey Syrup:
- 1 cup 240ml water – The base for the syrup.
- 1 cup 200g granulated sugar – Balances the sweetness and creates a glossy finish.
- ½ cup 120ml honey – Adds a rich, floral sweetness.
- 1 tbsp lemon juice – Prevents crystallization and enhances flavor.
- 1 cinnamon stick & 2 cloves – Infuses the syrup with a warm aromatic touch.
Instructions
Step 1: Prepare the Nut Filling
- In a mixing bowl, combine the chopped walnuts (or pistachios) with the sugar and ground cinnamon.
- Stir well to evenly coat the nuts with the sugar and spice. This filling is the heart of your kataifi, so make sure it’s well-mixed.
Step 2: Prepare the Kataifi Pastry
- Gently pull apart the strands of kataifi dough, separating them as much as possible. Don’t worry if they’re a little tangled—just work with them slowly.
- Brush a baking dish (about 9×13 inches) with melted butter. Take a handful of the separated kataifi dough and spread it evenly in the dish.
- Drizzle a little more melted butter over the dough. The butter is key to achieving that crispy, flaky texture you’ll love!
Step 3: Assemble the Kataifi Rolls
- Sprinkle a generous amount of the nut filling over the layer of dough in the baking dish.
- Carefully roll the dough around the nuts, forming small bundles. Don’t worry if the rolls aren’t perfect—this dessert is rustic and charming in its imperfections!
- Once all the kataifi dough is rolled up, drizzle the remaining melted butter over the top.
Step 4: Bake to Perfection
- Preheat your oven to 350°F (175°C).
- Bake the kataifi for 30-40 minutes or until the dough is golden brown and crispy. Keep an eye on it, as baking times may vary slightly based on your oven. The kataifi pastry should be beautifully golden and crunchy by the end!
Step 5: Make the Honey Syrup
- While the kataifi is baking, prepare the syrup. In a saucepan, combine water, sugar, honey, lemon juice, and the cinnamon stick and cloves.
- Gently heat the mixture over medium heat, allowing it to come to a simmer while stirring occasionally until the sugar dissolves completely.
- Let the syrup simmer for 10-15 minutes until it thickens slightly, then remove it from heat.
Step 6: Soak the Kataifi in Syrup
- Once the kataifi is done baking and has cooled slightly, pour the hot honey syrup evenly over the rolls. Let the syrup soak into the kataifi for about 10-15 minutes. You’ll notice the dough will become beautifully sticky and sweet.
Step 7: Serve and Enjoy
- After allowing the syrup to soak in, your kataifi is ready to be enjoyed! You can garnish with a dusting of cinnamon or some crushed pistachios for extra flair.
- This dessert is perfect for special occasions, or when you just want to treat yourself to something incredibly satisfying! Enjoy every crispy, syrupy bite!
Video
Notes
- Prep Time: 25 minutes
- Cook Time: 30 minutes
- Total Time: 55 minutes
- Servings: 12 servings
- Calories: 300 kcal per serving (varies based on specific ingredients used)
FAQs About Kataifi Recipe
1. What is Kataifi?
Kataifi is a traditional Middle Eastern dessert made from shredded phyllo dough, filled with nuts and soaked in sweet honey syrup. It’s known for its crispy, golden texture and nutty, syrupy flavor.
2. Can I use different nuts for the Kataifi filling?
Absolutely! While the classic kataifi recipe often uses walnuts or pistachios, you can substitute with other nuts like almonds, hazelnuts, or even pine nuts. Just ensure you chop them into smaller pieces to help them mix evenly throughout the filling.
3. How do I store Kataifi?
Store your kataifi in an airtight container at room temperature for up to 2-3 days. If you want to keep it for longer, refrigerate it and reheat in the oven before serving to regain its crispy texture.
4. Can I make Kataifi ahead of time?
Yes, you can prepare the kataifi recipe ahead of time. Simply assemble the rolls and refrigerate them (without syrup). When you’re ready to serve, bake and then pour the syrup over for a freshly made taste.
5. What can I serve with Kataifi?
Kataifi pairs wonderfully with vanilla ice cream, Turkish coffee, or a cup of fresh Greek tea. You can also top it with whipped cream or fresh berries for a special touch.
6. How do I prevent Kataifi from becoming soggy?
To avoid a soggy result, ensure that the syrup is not too hot when you pour it over the kataifi. Let it cool for a few minutes before drizzling it over the pastry to allow the dough to absorb the syrup gradually.
7. Can I freeze Kataifi?
Yes, you can freeze kataifi before baking it. After assembling the rolls, place them on a baking sheet and freeze until they’re firm. Once they’ve hardened, carefully place them in a sealed container or a freezer-safe bag to prevent freezer burn. When you’re ready to bake, you can cook them directly from the freezer without thawing.
8. Why is my Kataifi dough not crisping up?
If your kataifi dough isn’t crisping up, it could be due to insufficient butter or syrup soaking in too quickly. Make sure you’re brushing each layer with enough butter and letting the baked pastry absorb the syrup gradually for the perfect crunch.
9. Can I make Kataifi with store-bought dough?
Yes, store-bought kataifi dough works perfectly for this recipe and is a time-saver! It’s available in most Middle Eastern or Mediterranean grocery stores, and it’s much easier to work with than homemade phyllo dough.
10. What other variations can I try with the Kataifi recipe?
You can experiment with various fillings like shredded coconut, chocolate, or even a combination of dried fruits. For a unique flavor, try infusing the syrup with cardamom or vanilla for added depth.
Craving more delightful desserts? Explore our Chocolate Chip Bread recipe for another irresistible treat!