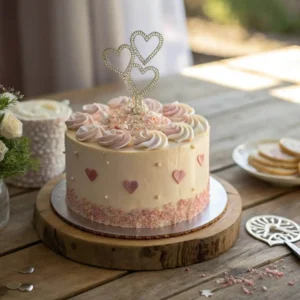
Taylor Swift Birthday Cake
Check out stunning Taylor Swift birthday cake designs that will thrill all Swifties! Make your celebration extraordinary with these creative ideas!
Ingredients
For the Cake:
- You can use vanilla chocolate, or funfetti as your base—whatever fits your vibe!
- 2 ½ cups 315g all-purpose flour – The base for a soft, tender cake.
- 2 ½ tsp baking powder – Helps the cake rise and stay light.
- ½ tsp salt – Balances sweetness and enhances flavor.
- 1 cup 225g unsalted butter, softened – Gives richness and moisture.
- 2 cups 400g granulated sugar – Adds the perfect sweetness.
- 4 large eggs – Make the cake fluffy and hold everything together.
- 1 tbsp vanilla extract – Because everything is better with vanilla.
- 1 cup 240ml whole milk – Adds moisture and keeps the cake soft.
- For a chocolate version, swap ½ cup of flour for ½ cup (40g unsweetened cocoa powder.)
For the Buttercream Frosting:
- This buttercream is smooth pipeable, and perfect for decorating—whether you’re going for a pastel Lover theme or a bold Reputation look.
- 1 ½ cups 340g unsalted butter, softened – The key to creamy, dreamy frosting.
- 5 cups 600g powdered sugar – Sweet and smooth for easy piping.
- ¼ cup 60ml heavy cream or milk – Adjusts the consistency.
- 1 tbsp vanilla extract – Adds that classic bakery flavor.
- A pinch of salt – Balances the sweetness.
- Gel food coloring – For Swiftie-inspired hues pastel pink, bold red, deep blue—whatever matches your vibe!.
Fun Extras for Decorating:
- This is where you can really bring your Taylor Swift cake ideas to life!
- Sprinkles – Because no Swiftie cake is complete without a little sparkle.
- Edible glitter – Perfect for a Fearless-era gold shimmer or Midnights-inspired shine.
- Piping bags & tips – For swirls lettering, and fun accents.
- Heart-shaped cake topper – A nod to Lover or Red.
- Mini friendship bracelets made from candy or icing – For a fun Eras Tour touch.
- Edible markers – Write lyrics or song titles directly on the cake!
Instructions
Step 1: Preheat & Prepare
- Start by getting your oven ready for baking:
- Preheat your oven to 350°F (175°C).
- Grease and line two 8-inch round cake pans with parchment paper to ensure the cakes come out easily.
Step 2: Mix the Cake Batter
- Whisk the dry ingredients – In a medium bowl, whisk together the flour, baking powder, and salt. Set this aside for now.
- Cream the butter and sugar – In a large bowl, beat the softened butter and sugar using an electric mixer until the mixture is light and fluffy (this usually takes about 2-3 minutes).
- Add the eggs – Add the eggs one at a time, mixing well after each addition to keep the batter smooth. Once all the eggs are in, add the vanilla extract and beat until combined.
- Combine the dry and wet ingredients – Gradually add half of the dry ingredients into the batter, followed by half of the milk. Mix well before adding the remaining dry ingredients and milk. Stir gently until everything is just combined, making sure not to overwork the batter.
Step 3: Bake the Cake
- Pour the batter evenly into the two prepared cake pans.
- Bake in the preheated oven for 28-32 minutes, or until a toothpick inserted into the center comes out clean.
- Allow the cakes to cool in the pans for around 10 minutes, then carefully remove them and transfer to a wire rack to cool fully.
Step 4: Prepare the Buttercream Frosting
- Beat the softened butter in a large bowl until it’s smooth and creamy.
- Gradually add the powdered sugar, mixing at low speed to avoid a sugary cloud, then increase to medium speed until fully combined.
- Add vanilla extract and heavy cream, then beat on high for about 2-3 minutes until the frosting is light and fluffy. If you need to adjust the consistency, add a little more cream or powdered sugar as needed.
- Divide the frosting into separate bowls if you want to use different colors, then add gel food coloring to each bowl to match your chosen Taylor Swift era.
Step 5: Assemble the Cake
- Level your cakes – If the cakes have domed on top, carefully slice off the top with a serrated knife to make them even.
- Assemble the cake layers – Set one cake layer on your serving plate and spread a generous amount of frosting over the top before adding the second layer.
- Apply a crumb coat – Spread a thin layer of frosting over the whole cake and refrigerate for about 15 minutes to set the crumb coat.
- Frost generously – After the crumb coat has set, apply a thicker layer of frosting all over the cake. Smooth it out or create texture with a spatula, depending on your style.
Step 6: Decorate
- Now comes the fun part—decorating! Here are some Swiftie-inspired ideas for your cake:
- Piping details – Use a piping bag with your favorite tip to create fun designs like swirls, flowers, or even write Taylor Swift lyrics on the cake!
- Sprinkles and edible glitter – For a sparkly touch, add some edible glitter or colorful sprinkles that match your Eras Tour theme.
- Add cake toppers – Use a heart-shaped topper for a Lover vibe, or add mini friendship bracelets for a fun Eras Tour touch.
- Write on the cake – If you’re feeling creative, use edible markers to write a quote from your favorite Taylor Swift song.
Video
Notes
Recipe Details:
- Prep Time: 30 minutes
- Cook Time: 25-30 minutes
- Total Time: 1 hour (includes cooling time)
- Servings: 12-14 slices
- Calories: Approx. 450 calories per serving (based on standard portion size)